Hands-On with the Kubernetes Gateway API: A 30-Minute Tutorial
Kubernetes continues to revolutionize the way we deploy and manage applications. The recent GA 1.0 release of the Kubernetes Gateway API represents a significant leap forward in simplifying and enhancing the management of networking within Kubernetes clusters.
It is an important standards milestone for the Kubernetes community. It represents an evolution in capabilities from the earlier Kubernetes Ingress API. This is evidenced by the many vendors and open-source communities within the API gateway and service mesh ecosystems moving aggressively to adopt it.
In this blog post, we dive into the intricacies of the Kubernetes Gateway API with a tutorial that guides you through an initial implementation using a beta version of the open-source Gloo Gateway v2.0. Whether you’re a seasoned Kubernetes user or just getting started, this tutorial equips you with the knowledge to use the Gateway API for external connectivity into your Kubernetes environment.
Join us as we explore the key concepts and a practical step-by-step guide to harness the power of the Kubernetes Gateway API.
How long will it take to configure your first cloud-native application on an open-source API Gateway? How about 30 minutes? Give us that much time and we’ll give you a Kubernetes-hosted application accessible via a gateway configured with policies for routing, service discovery, timeouts, debugging, access logging, and observability. We’ll host all of this on a local KinD (Kubernetes in Docker) cluster to keep the setup standalone and as simple as possible. In addition, this gateway will be laid on the foundation of Envoy Proxy, the open-source proxy that comprises the backbone of some of the most influential enterprise cloud projects available today, like Istio.
Let’s get started!
Prerequisites
For this exercise, we’re going to do all the work on your local workstation. All you’ll need to get started is a Docker-compatible environment such as Docker Desktop, plus the CLI utilities kubectl, kind, and curl. Make sure these are all available to you before jumping into the next section. I’m building this on MacOS but other platforms should be perfectly fine as well.
Install
Let’s start by installing the platform and application components we need for this exercise.
Install KinD cluster
Once you have the kind utility installed along with Docker on your local workstation, creating a cluster to host this exercise is simple and takes only about a minute. Run the command:
kind create cluster
You should see:
Creating cluster "kind" ...
 ✓ Ensuring node image (kindest/node:v1.27.3) 🖼
 ✓ Preparing nodes 📦
 ✓ Writing configuration 📜
 ✓ Starting control-plane 🕹️
 ✓ Installing CNI 🔌
 ✓ Installing StorageClass 💾
Set kubectl context to "kind-kind"
You can now use your cluster with:

kubectl cluster-info --context kind-kind

Not sure what to do next? 😅  Check out https://kind.sigs.k8s.io/docs/user/quick-start/
Confirm that your kube config is pointing to your new cluster using this command:
kubectl config use-context kind-kind
The response should be:
Switched to context "kind-kind".
Install Httpbin Application
HTTPBIN is a great little service that can be used to test a variety of HTTP operations and echo both request and response elements back to the consumer. We’ll use it throughout this exercise. First, we’ll install the httpbin service on our kind cluster. Run:
kubectl apply -f https://raw.githubusercontent.com/solo-io/solo-blog/main/gateway-api-tutorial/01-httpbin-svc.yaml
You should see:
namespace/httpbin created
serviceaccount/httpbin created
service/httpbin created
deployment.apps/httpbin created
You can confirm that the httpbin pod is running by checking the httpbin namespace that we just created:
kubectl rollout status deploy/httpbin -n httpbin
kubectl get pods -n httpbin
After a few seconds you should see a response like this, confirming that the httpbin pod is in a `Running` state:
deployment "httpbin" successfully rolled out
NAME                       READY   STATUS    RESTARTS   AGE
httpbin-66cdbdb6c5-2cnm7   1/1     Running   0          21m
Install Glooctl Utility
GLOOCTL is a command-line utility that allows users to view, manage, and debug Gloo Gateway deployments, much like a Kubernetes user employs the kubectl utility. Let’s install glooctl on our local workstation:
curl -sL https://run.solo.io/gloo/install | GLOO_VERSION=v2.0.0-beta1 sh
export PATH=$HOME/.gloo/bin:$PATH
We’ll test out the installation using the glooctl version command. It responds with the version of the CLI client that you have installed. However, the server version is undefined since we have not yet installed Gloo Gateway. Enter:
glooctl version
Which responds:
Client: {"version":"2.0.0-beta1"}
Server: version undefined, could not find any version of gloo running
Note that we’re using the beta1 version of open-source Gloo Gateway v2.0.0 for this exercise. While it is still an early beta, it has already been certified as fully conformant to the new Gateway API spec.

Install Gloo Gateway
Finally, we will complete installation by configuring an instance of open-source Gloo Gateway on our kind cluster.
glooctl install --gateway
And you’ll see:
Creating namespace gloo-system... Done.
Applying Gateway CRDs... Done
Applying Manifest... Done
Creating Gateway Object... Done
All resources have been successfully initialized!
Please run glooctl check to make sure everything is up and running :)
glooctl CLI to install the product for simplicity, Gloo Gateway also offers full Helm support, which is more suitable for repeatable enterprise deployments.It should take less than a minute for all Gloo Gateway components to be ready for use. Use this command to wait:
kubectl rollout status deployment/gloo-proxy-http -n gloo-system
If you receive an error like this — Error from server (NotFound): deployments.apps "gloo-proxy-http" not found — that’s not a problem. Just wait a few seconds and try again.
The system will eventually respond with this:
deployment "gloo-proxy-http" successfully rolled out
That’s all that’s required to install Gloo Gateway. Notice that we did not install or configure any kind of external database to manage Gloo artifacts. That’s because the product was architected from Day 1 to be Kubernetes-native. All artifacts are expressed as Kubernetes Custom Resources, and they are all stored in native etcd storage. Consequently, Gloo Gateway leads to more resilient and less complex systems than alternatives that are either cloud-washed into Kubernetes or require external moving parts.
Note that everything we do in this getting-started exercise runs on the open-source version of Gloo Gateway. There is also an enterprise edition of Gloo Gateway that adds features to support advanced authentication and authorization, rate limiting, and observability, to name a few. If you’d like to work through this blog post using enterprise Gloo Gateway instead, then request a free trial here.
Installation Troubleshooting
If you encounter errors installing Gloo Gateway on your workstation, like a message indicating that your gloo-proxy-http deployment is not progressing, then your local Docker installation may be under-resourced. If increasing your Docker resources is impractical, there is another way to walk through this exercise as well. Check out an adaptation of this exercise provisioned in a managed Instruqt environment here. All of your resource limitations will be removed and you won’t need to install anything to get up and running.
Control
At this point, you should have a Kubernetes cluster configured, along with the glooctl CLI and the core Gloo Gateway services. This includes both an Envoy data plane and the Gloo control plane. Now we’ll configure external access to Gloo Gateway, plus establish and test routing rules that are the core of the proxy configuration.
Establish External Access to Proxy
Because we are running Gloo Gateway inside a Docker-hosted cluster that’s not linked to our host network, the network endpoints of the Envoy data plane aren’t exposed to our development workstation by default. We will use a simple port-forward to expose the proxy’s HTTP port for us to use. (Note that gloo-proxy-http is Gloo’s deployment of the Envoy data plane.)
kubectl port-forward deployment/gloo-proxy-http -n gloo-system 8080:8080 &
This returns:
Forwarding from 127.0.0.1:8080 -> 8080
Forwarding from [::1]:8080 -> 8080
With this port-forward in place, we’ll be able to access the routes we are about to establish using port 8080 of our workstation.
Configure Simple Routing with an HTTPRoute
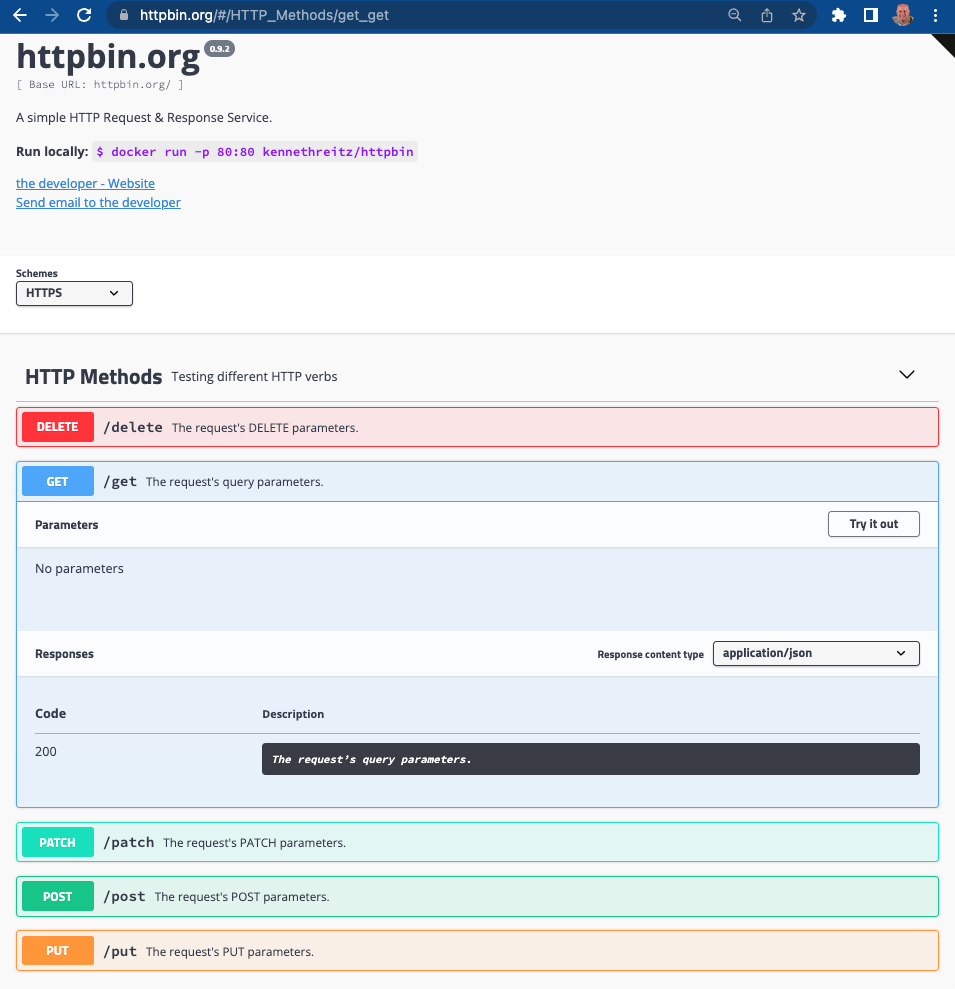
Let’s begin our routing configuration with the simplest possible route to expose the /get operation on httpbin. This endpoint simply reflects back in its response the headers and any other arguments passed into the service with an HTTP GET request. You can sample the public version of this service here.
HTTPRoute is one of the new Kubernetes CRDs introduced by the Gateway API, as documented here. We’ll start by introducing a simple HTTPRoute for our service.
apiVersion: gateway.networking.k8s.io/v1beta1
kind: HTTPRoute
metadata:
  name: httpbin
  namespace: httpbin
  labels:
    example: httpbin-route
spec:
  parentRefs:
    - name: http
      namespace: gloo-system
  hostnames:
    - "api.example.com"
  rules:
  - matches:
    - path:
        type: Exact
        value: /get
    backendRefs:
      - name: httpbin
        port: 8000
This example attaches to the default Gateway object created for us when we installed Gloo Gateway earlier. See the gloo-system/http reference in the parentRefs stanza. The Gateway object simply represents a host:port listener that the proxy will expose to accept ingress traffic.

Source: Gateway API HTTPRoute docs – https://gateway-api.sigs.k8s.io/api-types/httproute/#spec
Our route watches for HTTP requests directed at the host api.example.com with the request path /get and then forwards the request to the httpbin service on port 8000.
Let’s establish this route now:
kubectl apply -f https://raw.githubusercontent.com/solo-io/solo-blog/main/gateway-api-tutorial/02-httpbin-route.yaml
Expect to see this output:
httproute.gateway.networking.k8s.io/httpbin created
Test the Simple Route with Curl
Now that the HTTPRoute is in place, let’s use curl to display the response with the -i option to additionally show the HTTP response code and headers.
curl -is -H "Host: api.example.com" http://localhost:8080/get
This command should complete successfully:
HTTP/1.1 200 OK
server: envoy
date: Mon, 27 Nov 2023 21:46:49 GMT
content-type: application/json
content-length: 238
access-control-allow-origin: *
access-control-allow-credentials: true
x-envoy-upstream-service-time: 35

{
  "args": {},
  "headers": {
    "Accept": "*/*",
    "Host": "api.example.com",
    "User-Agent": "curl/8.1.2",
    "X-Envoy-Expected-Rq-Timeout-Ms": "15000"
  },
  "origin": "10.244.0.7",
  "url": "http://api.example.com/get"
}
Note that if we attempt to invoke another valid endpoint /delay on the httpbin service, it will fail with a 404 Not Found error. Why? Because our HTTPRoute policy is only exposing access to /get, one of the many endpoints available on the service. If we try to consume an alternative httpbin endpoint like /delay:
curl -is -H "Host: api.example.com" http://localhost:8080/delay/1
Then we’ll see:
HTTP/1.1 404 Not Found
date: Mon, 27 Nov 2023 21:48:43 GMT
server: envoy
content-length: 0
Explore Routing with Regex Matching Patterns
Let’s assume that now we DO want to expose other httpbin endpoints like /delay. Our initial HTTPRoute is inadequate, because it is looking for an exact path match with /get.
We’ll modify it in a couple of ways. First, we’ll modify the matcher to look for path prefix matches instead of an exact match. Second, we’ll add a new request filter to rewrite the matched /api/httpbin/ prefix with just a / prefix, which will give us the flexibility to access any endpoint available on the httpbin service. So a path like /api/httpbin/delay/1 will be sent to httpbin with the path /delay/1.
Here are the modifications we’ll apply to our HTTPRoute:
    - matches:
        # Switch from an Exact Matcher to a PathPrefix Matcher
        - path:
            type: PathPrefix
            value: /api/httpbin/
      filters:
        # Replace the /api/httpbin matched prefix with /
        - type: URLRewrite
          urlRewrite:
            path:
              type: ReplacePrefixMatch
              replacePrefixMatch: /
Let’s apply the modified HTTPRoute and test. Note that throughout this exercise, we are managing Gloo Gateway artifacts using Kubernetes utilities like kubectl. That’s an important point because it allows developers to work with familiar tools when working with Gloo Gateway configuration. It also benefits organizations using GitOps strategies to manage deployments, as tools like ArgoCD and Flux are able to easily handle Gloo artifacts as first-class Kubernetes citizens. Learn more about using Gloo technologies with GitOps in this demonstration video.
kubectl apply -f https://raw.githubusercontent.com/solo-io/solo-blog/main/gateway-api-tutorial/03-httpbin-rewrite.yaml
Expect to see this response:
httproute.gateway.networking.k8s.io/httpbin configured
Test Routing with Regex Matching Patterns
When we used only a single route with an exact match pattern, we could only exercise the httpbin /get endpoint. Let’s now use curl to confirm that both /get and /delay work as expected.
% curl -is -H "Host: api.example.com" http://localhost:8080/api/httpbin/get
HTTP/1.1 200 OK
server: envoy
date: Mon, 27 Nov 2023 21:54:25 GMT
content-type: application/json
content-length: 288
access-control-allow-origin: *
access-control-allow-credentials: true
x-envoy-upstream-service-time: 14

{
  "args": {},
  "headers": {
    "Accept": "*/*",
    "Host": "api.example.com",
    "User-Agent": "curl/8.1.2",
    "X-Envoy-Expected-Rq-Timeout-Ms": "15000",
    "X-Envoy-Original-Path": "/api/httpbin/get"
  },
  "origin": "10.244.0.7",
  "url": "http://api.example.com/get"
}
% curl -is -H "Host: api.example.com" http://localhost:8080/api/httpbin/delay/1
HTTP/1.1 200 OK
server: envoy
date: Mon, 27 Nov 2023 21:55:48 GMT
content-type: application/json
content-length: 342
access-control-allow-origin: *
access-control-allow-credentials: true
x-envoy-upstream-service-time: 1015

{
  "args": {},
  "data": "",
  "files": {},
  "form": {},
  "headers": {
    "Accept": "*/*",
    "Host": "api.example.com",
    "User-Agent": "curl/8.1.2",
    "X-Envoy-Expected-Rq-Timeout-Ms": "15000",
    "X-Envoy-Original-Path": "/api/httpbin/delay/1"
  },
  "origin": "10.244.0.7",
  "url": "http://api.example.com/delay/1"
}
Perfect! It works just as expected! Note that the /delay operation completed successfully and that the 1-second delay was applied. The response header x-envoy-upstream-service-time: 1015 indicates that Envoy reported that the upstream httpbin service required just over 1 second (1,015 milliseconds) to process the request. In the initial /get operation, which doesn’t inject an artificial delay, observe that the same header reported only 14 milliseconds of upstream processing time.
For extra credit, try out some of the other endpoints published via httpbin as well, like /status and /post.
Test Transformations with Upstream Bearer Tokens
What if we have a requirement to authenticate with one of the backend systems to which we route our requests? Let’s assume that this upstream system requires an API key for authorization, and that we don’t want to expose this directly to the consuming client. In other words, we’d like to configure a simple bearer token to be injected into the request at the proxy layer.
We can express this in the Gateway API by adding a filter that applies a simple transformation to the incoming request. This will be applied along with the URLRewrite filter we created in the previous step. The new filters stanza in our HTTPRoute now looks like this:
      filters:
        - type: URLRewrite
          urlRewrite:
            path:
              type: ReplacePrefixMatch
              replacePrefixMatch: /
        # Add a Bearer token to supply a static API key when routing to backend system
        - type: RequestHeaderModifier
          requestHeaderModifier:
            add:
              - name: Authorization
                value: Bearer my-api-key
Let’s apply this policy update:
kubectl apply -f https://raw.githubusercontent.com/solo-io/solo-blog/main/gateway-api-tutorial/04-httpbin-rewrite-xform.yaml
Expect this response:
httproute.gateway.networking.k8s.io/httpbin configured
Now we’ll test using curl:
curl -is -H "Host: api.example.com" http://localhost:8080/api/httpbin/get
Note that our bearer token is now passed to the backend system in an Authorization header.
HTTP/1.1 200 OK
server: envoy
date: Mon, 27 Nov 2023 22:09:14 GMT
content-type: application/json
content-length: 331
access-control-allow-origin: *
access-control-allow-credentials: true
x-envoy-upstream-service-time: 15
{
  "args": {},
  "headers": {
  "Accept": "*/*",
  "Authorization": "Bearer my-api-key",
  "Host": "api.example.com",
  "User-Agent": "curl/8.1.2",
  "X-Envoy-Expected-Rq-Timeout-Ms": "15000",
  "X-Envoy-Original-Path": "/api/httpbin/get"
},
"origin": "10.244.0.7",
"url": "http://api.example.com/get"
}
Gloo technologies have a long history of providing sophisticated transformation policies with its gateway products, providing capabilities like in-line Inja templates that can dynamically compute values from multiple sources in request and response transformations.
The core Gateway API does not offer this level of sophistication in its transformations, but there is good news. The community has learned from its experience with earlier, similar APIs like the Kubernetes Ingress API. The Ingress API did not offer extension points, which locked users strictly into the set of features envisioned by the creators of the standard. This ensured limited adoption of that API. So while many cloud-native API gateway vendors like Solo support the Ingress API, its active development has largely stopped.
The good news is that the new Gateway API offers core functionality as described in this blog post. But just as importantly, it delivers extensibility by allowing vendors to specify their own Kubernetes CRDs to specify policy. In the case of transformations, Gloo Gateway users can look forward to Solo APIs similar to its TransformationPolicy adding important capabilities to the gateway, while staying within the boundaries of the new standard.
Migrate
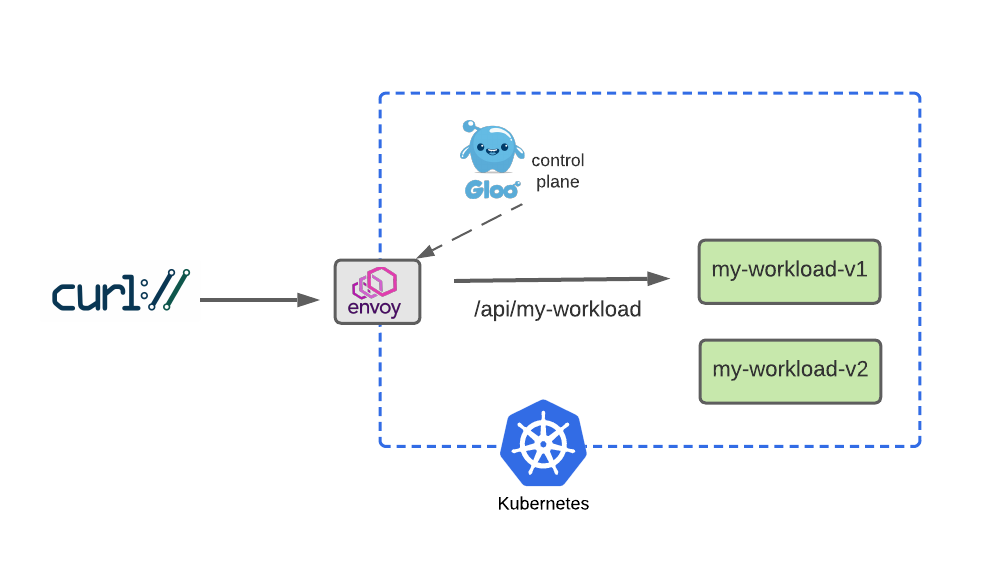
Delivering policy-driven migration of service workloads across multiple application versions is a growing practice among enterprises modernizing to cloud-native infrastructure. In this section, we’ll explore how a couple of common service migration techniques, dark launches with header-based routing and canary releases with percentage-based routing, are supported by the Gateway API standard.
Configure Two Workloads for Migration Routing
Let’s first establish two versions of a workload to facilitate our migration example. We’ll use the open-source Fake Service to enable this. Let’s establish a v1 of our my-workload service that’s configured to return a response string containing “v1”. We’ll create a corresponding my-workload-v2 service as well.
kubectl apply -f https://raw.githubusercontent.com/solo-io/solo-blog/main/gateway-api-tutorial/05-workload-svcs.yaml
You should see the response below, indicating deployments for both v1 and v2 of my-workload have been created in the my-workload namespace.
namespace/my-workload created
serviceaccount/my-workload created
deployment.apps/my-workload-v1 created
deployment.apps/my-workload-v2 created
service/my-workload-v1 created
service/my-workload-v2 created
Confirm that the my-workload pods are running as expected using this command:
kubectl get pods -n my-workload
Expect status similar to this in the return:
NAME                              READY   STATUS    RESTARTS   AGE
my-workload-v1-7577fdcc9d-82bsn   1/1     Running   0          26s
my-workload-v2-68f84654dd-7g9r9   1/1     Running   0          26s
Test Simple V1 Routing
Before we dive into routing to multiple services, we’ll start by building a simple HTTPRoute that sends HTTP requests to host api.example.com whose paths begin with /api/my-workload to the v1 workload:
apiVersion: gateway.networking.k8s.io/v1beta1
kind: HTTPRoute
metadata:
  name: my-workload
  namespace: my-workload
  labels:
    example: my-workload-route
spec:
  parentRefs:
    - name: http
      namespace: gloo-system
  hostnames:
    - "api.example.com"
  rules:
    - matches:
      - path:
          type: PathPrefix
          value: /api/my-workload
      backendRefs:
        - name: my-workload-v1
          namespace: my-workload
          port: 8080
Now apply this route:
kubectl apply -f https://raw.githubusercontent.com/solo-io/solo-blog/main/gateway-api-tutorial/06-workload-route.yaml
Expect this result:
httproute.gateway.networking.k8s.io/my-workload created
Now test this route:
curl -is -H "Host: api.example.com" http://localhost:8080/api/my-workload
See from the message body that v1 is the responding service, just as expected:
HTTP/1.1 200 OK
vary: Origin
date: Fri, 17 Nov 2023 20:08:20 GMT
content-length: 292
content-type: text/plain; charset=utf-8
x-envoy-upstream-service-time: 37
server: envoy
{
  "name": "my-workload-v1",
  "uri": "/api/my-workload",
  "type": "HTTP",
  "ip_addresses": [
    "10.244.0.9"
  ],
  "start_time": "2023-11-17T20:08:20.888290",
  "end_time": "2023-11-17T20:08:20.897388",
  "duration": "9.098ms",
  "body": "Hello From My Workload (v1)!",
  "code": 200
}
Simulate a v2 Dark Launch with Header-Based Routing
Dark Launch is a great cloud migration technique that releases new features to a select subset of users to gather feedback and experiment with improvements before potentially disrupting a larger user community.
We will simulate a dark launch in our example by installing the new cloud version of our service in our Kubernetes cluster, and then using declarative policy to route only requests containing a particular header to the new v2 instance. The vast majority of users will continue to use the original v1 of the service just as before.

  rules:
    - matches:
      - path:
          type: PathPrefix
          value: /api/my-workload
        # Add a matcher to route requests with a v2 version header to v2
        headers:
        - name: version
          value: v2
      backendRefs:
        - name: my-workload-v2
          namespace: my-workload
          port: 8080
    - matches:
      # Route requests without the version header to v1 as before
      - path:
          type: PathPrefix
          value: /api/my-workload
      backendRefs:
        - name: my-workload-v1
          namespace: my-workload
          port: 8080
Configure two separate routes, one for v1 that the majority of service consumers will still use, and another route for v2 that will be accessed by specifying a request header with name version and value v2. Let’s apply the modified HTTPRoute:
kubectl apply -f https://raw.githubusercontent.com/solo-io/solo-blog/main/gateway-api-tutorial/07-workload-route-header.yaml
Expect this response:
httproute.gateway.networking.k8s.io/my-workload configured
Now we’ll test the original route, with no special headers supplied, and confirm that traffic still goes to v1:
% curl -is -H "Host: api.example.com" http://localhost:8080/api/my-workload | grep body
  "body": "Hello From My Workload (v1)!",
But it we supply the version: v2 header, note that our gateway routes the request to v2 as expected:
% curl -is -H "Host: api.example.com" -H "version: v2" http://localhost:8080/api/my-workload | grep body
  "body": "Hello From My Workload (v2)!",
Our dark launch routing rule works exactly as planned!
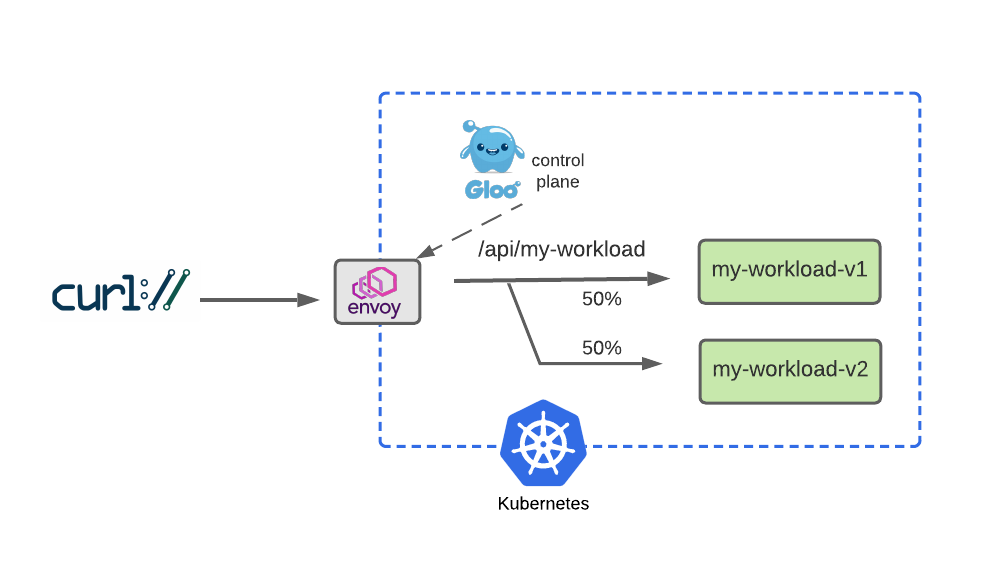
Expand V2 Testing with Percentage-Based Routing
After a successful dark-launch, we may want a period where we use a blue-green strategy of gradually shifting user traffic from the old version to the new one. Let’s explore this with a routing policy that splits our traffic evenly, sending half our traffic to v1 and the other half to v2.
We will modify our HTTPRoute to accomplish this by removing the header-based routing rule that drove our dark launch. Then we will replace that with a 50-50 weight applied to each of the routes, as shown below:
  rules:
    - matches:
      - path:
          type: PathPrefix
          value: /api/my-workload
      # Configure a 50-50 traffic split across v1 and v2
      backendRefs:
        - name: my-workload-v1
          namespace: my-workload
          port: 8080
          weight: 50
        - name: my-workload-v2
          namespace: my-workload
          port: 8080
          weight: 50
Apply this 50-50 routing policy with kubectl:
kubectl apply -f https://raw.githubusercontent.com/solo-io/solo-blog/main/gateway-api-tutorial/08-workload-route-split.yaml
Expect this response:
httproute.gateway.networking.k8s.io/my-workload configured
Now we’ll test this with a script that exercises this route 100 times. We expect to see roughly half go to v1 and the others to v2.
% for i in $(seq 1 100) ; do curl -s -H "Host: api.example.com" http://localhost:8080/api/my-workload/ ; done | grep -c "(v1)"
50
This result may vary somewhat but should be close to 50. Experiment with larger sample sizes to yield results that converge on 50%.
Debug
Let’s be honest with ourselves: Debugging bad software configuration is a pain. Gloo engineers have done their best to ease the process as much as possible, with documentation like this, for example. However, as we have all experienced, it can be a challenge with any complex system. In this slice of our 15 minutes, we’ll explore how to use the glooctl utility to assist in some simple debugging tasks for a common problem.
Solve a Problem with Glooctl CLI
A common source of Gloo configuration errors is mistyping an upstream reference, perhaps when copy/pasting it from another source but “missing a spot” when changing the name of the backend service target. In this example, we’ll simulate making an error like that, and then demonstrating how glooctl can be used to detect it.
First, let’s apply a change to simulate the mistyping of an upstream config so that it is targeting a non-existent my-bad-workload-v2 backend service, rather than the correct my-workload-v2.
kubectl apply -f https://raw.githubusercontent.com/solo-io/solo-blog/main/gateway-api-tutorial/09-workload-route-split-bad-dest.yaml
You should see:
httproute.gateway.networking.k8s.io/my-workload configured
When we test this out, note that the 50-50 traffic split is still in place. This means that about half of the requests will be routed to my-workload-v1 and succeed, while the others will attempt to use the non-existent my-bad-workload-v2 and fail like this:
% curl -is -H "Host: api.example.com" http://localhost:8080/api/my-workload
HTTP/1.1 500 Internal Server Error
date: Tue, 28 Nov 2023 20:58:43 GMT
server: envoy
content-length: 0
So we’ll deploy one of the first weapons from the Gloo debugging arsenal, the glooctl check utility. It verifies a number of Gloo resources, confirming that they are configured correctly and are interconnected with other resources correctly. For example, in this case, glooctl will detect the error in the mis-connection between the HTTPRoute and its backend target:
glooctl check
You can see the checks respond:
% glooctl check
Checking deployments... OK
Checking GatewayClass... OK
Checking Gateways... OK
Checking HTTPRoutes... 1 Errors!
Error: 1 error occurred:
	* HTTPRoute my-workload.my-workload.http status (ResolvedRefs) is not set to expected (True). Reason: BackendNotFound, Message:
The detected errors clearly identify that the HTTPRoute named my-workload in the namespace my-workload is pointed at an invalid backend destination.
Note that inspecting the status of the HTTPRoute custom resource yields similar diagnostics:
% kubectl get httproute my-workload -n my-workload -o yaml
...
status:
  parents:
  - conditions:
    - lastTransitionTime: "2023-11-28T21:09:20Z"
      message: ""
      observedGeneration: 6
      reason: BackendNotFound
      status: "False"
      type: ResolvedRefs
...
This is still an early beta release with the new Gateway API. So the diagnostics and tooling will improve over time. But even this is sufficient to point us to the root cause of our configuration problem.
Armed with these insights, let’s reapply the previous configuration, and then we’ll confirm that the glooctl configuration is again clean.
kubectl apply -f https://raw.githubusercontent.com/solo-io/solo-blog/main/gateway-api-tutorial/08-workload-route-split.yaml
Now we see confirmation of our change:
httproute.gateway.networking.k8s.io/my-workload configured
Re-run glooctl check and observe that there are no problems. Our curl commands to the my-workload services will also work again as expected:
Checking deployments... OK
Checking GatewayClass... OK
Checking Gateways... OK
Checking HTTPRoutes... OK
No problems detected.
Observe
Finally, let’s tackle a final exercise where we’ll learn about some simple observability tools that ship with open-source Gloo Gateway.
Explore Envoy Metrics
Envoy publishes a host of metrics that may be useful for observing system behavior. In our very modest kind cluster for this exercise, you can count over 3,000 individual metrics! You can learn more about them in the Envoy documentation here.
For this 30-minute exercise, let’s take a quick look at a couple of the useful metrics that Envoy produces for every one of our backend targets.
First, we’ll port-forward the Envoy administrative port 19000 to our local workstation:
kubectl -n gloo-system port-forward deployment/gloo-proxy-http 19000 &
This shows:
Forwarding from 127.0.0.1:19000 -> 19000
Forwarding from [::1]:19000 -> 19000
For this exercise, let’s view two of the relevant metrics from the first part of this exercise: one that counts the number of successful (HTTP 2xx) requests processed by our httpbin backend (or cluster, in Envoy terminology), and another that counts the number of requests returning server errors (HTTP 5xx) from that same backend:
curl -s http://localhost:19000/stats | grep -E "(^cluster.httpbin-httpbin-8000_httpbin.upstream.*(2xx|5xx))"
Which gives us:
cluster.httpbin-httpbin-8000_httpbin.upstream_rq_2xx: 12
cluster.httpbin-httpbin-8000_httpbin.upstream_rq_5xx: 2
As you can see, on my Envoy instance I’ve processed twelve good requests and two bad ones. (Note that if your Envoy has not processed any 5xx requests for httpbin yet, then there will be no entry present. But after the next step, that metrics counter should be established with a value of 1.)
If we apply a curl request that forces a 500 failure from the httpbin backend, using the /status/500 endpoint, I’d expect the number of 2xx requests to remain the same, and the number of 5xx requests to increment by one:
% curl -is -H "Host: api.example.com" http://localhost:8080/api/httpbin/status/500
HTTP/1.1 500 Internal Server Error
server: envoy
date: Tue, 28 Nov 2023 22:06:00 GMT
content-type: text/html; charset=utf-8
access-control-allow-origin: *
access-control-allow-credentials: true
content-length: 0
x-envoy-upstream-service-time: 12
Now re-run the command to harvest the metrics from Envoy:
curl -s http://localhost:19000/stats | grep -E "(^cluster.httpbin-httpbin-8000_httpbin.upstream.*(2xx|5xx))"
And we see the 5xx metric for the httpbin cluster updated just as we expected!
cluster.httpbin-httpbin-8000_httpbin.upstream_rq_2xx: 12
cluster.httpbin-httpbin-8000_httpbin.upstream_rq_5xx: 3
If you’d like to have more tooling and enhanced visibility around system observability, we recommend taking a look at an Enterprise subscription to Gloo Gateway. You can sign up for a free trial here.
Gloo Gateway is easy to integrate with both Prometheus and Grafana, allowing you to replace curl and grep with per-backend generated dashboards like the one below. You can also integrate with enterprise observability platforms like New Relic and Datadog. (And with New Relic, you get the added benefit of using a product that has already adopted Solo’s gateway technology.)
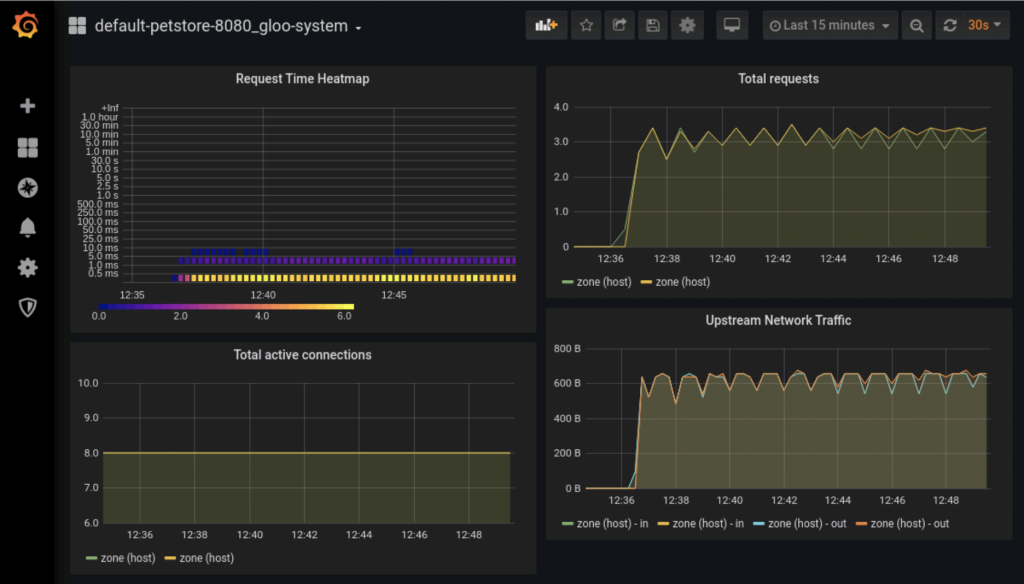
You can learn more about creating your own Grafana dashboards from Gloo metrics in this blog post.
Cleanup
If you’d like to cleanup the work you’ve done, simply delete the kind cluster where you’ve been working.
kind delete cluster
Some Final Thoughts
In this blog post, we explored how you can get started with the open-source edition of Gloo Gateway and the Kubernetes Gateway API in 30 minutes on your own workstation. We walked step-by-step through the process of standing up a KinD cluster, installing application services, and then managing it with policies for routing, service discovery, traffic shifting, debugging, and observability. All of the code used in this guide is available on GitHub.
Here are some lessons we’ve learned on our journey through this Gateway API getting started exercise.
- The Gateway API standard is a good start. Its early widespread adoption bodes well for its future. It’s not a panacea in and of itself.
- The base Gateway API standard in many respects represents a Lowest Common Denominator for ingress requirements in the enterprise, much like original Kubernetes Ingress API. However, there is one substantial difference: the Gateway API is extensible both by vendors and other open-source communities.
- Most enterprise users will require more sophisticated policies than the base standard requires: external auth, rate limiting, dynamic transformation models, GraphQL, and others. Implementers of the standard are encouraged to do this via defined extension points. The trade-off for consumers is that use of these extensions may disrupt portability across implementations. But it’s the best approach to ensure that this standard has “legs” beyond the base capabilities that the standard requires. The Gateway API provides a core of standard behavior with extension points to address real-world problems.
- Tooling and visualization will get even better over time. We’re still in the early days for this standard as a GA product. But expect to see lessons already learned from years of cloud-native gateway experience finding their way quickly into implementations of this important standard.
Learn more
- Explore the Kubernetes Gateway API documentation.
- Questions? Join the Solo.io Slack community.
- Request a live demo or trial for the enterprise edition of Gloo Gateway.

Gloo Gateway
Get a free trial of the next generation API gateway for all your microservices
Request a Trial