
Just about every major cloud provider has made it easy to spin up Agents, interact with Agents, and use them for day-to-day work. With that power, however, comes a major concern for governance, security, and shadow AI.
How do you know which Agents are doing what, if they’re active, and what they have access to?
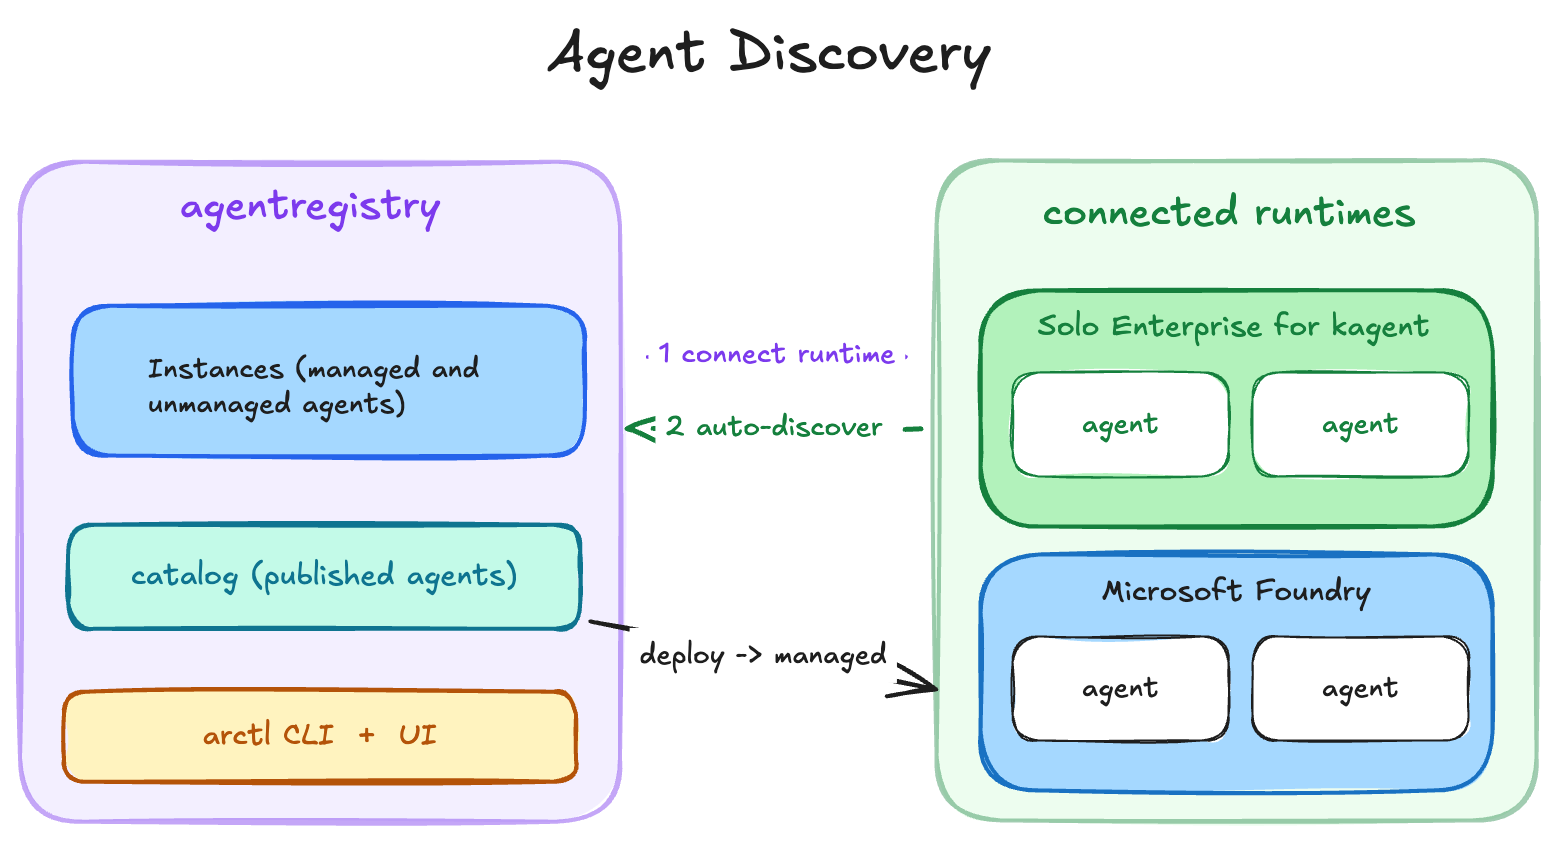
There needs to be a central place to discover Agents, and in this blog post, you’ll learn how to do so with agenregistry and Microsoft Foundry.
Why Discovery?
The industry has, for quite some time, had the concept of “Shadow IT”. An example is using an iPad for work without an IT department knowing about it. Now, imagine if someone had access to tens to hundreds of iPads on the corporate network? That would be a major governance and security problem.
The same rules apply for AI.
A major difference, though, is that spinning up multiple Agents is a lot easier than using a non-approved hardware device for work. Anyone, with a little access, can have an Agent begin to perform actions for them. These Agents, by default, can have access to whatever the user has access to. If the user using the Agent has access to all Kubernetes clusters, production databases, and cloud accounts, the Agent does too.
Without a proper method of discovering Agents, it’s incredibly easy to find yourself with tens or hundreds of Agents running and no one knows what they even do anymore.
With the “why” understood, let’s dive into the hands-on portion of implementing Foundry and Agents within Foundry.
Creating A Foundry Project
The first step to implementing discoverability within agentregistry for Microsoft Foundry is ensuring that you have a Foundry environment up and running. You will, of course, need access to an Azure environment to perform this section.
1. Create environment variables for your resource group, region, foundry name, and project name.
RG=""
LOCATION=""
FOUNDRY_RESOURCE=""
PROJECT_NAME="
2. Create the Resource Group.
az group create \
   --name "$RG" \
   --location "$LOCATION"
3. Create the Microsoft Foundry Service.
  az cognitiveservices account create \
    --name "$FOUNDRY_RESOURCE" \
    --resource-group "$RG" \
    --kind AIServices \
    --sku S0 \
    --location "$LOCATION" \
    --allow-project-management
4. Set the subdomain.
  az cognitiveservices account update \
    --name "$FOUNDRY_RESOURCE" \
    --resource-group "$RG" \
    --custom-domain "$FOUNDRY_RESOURCE"
5. Create the Project.
  az cognitiveservices account project create \
    --name "$FOUNDRY_RESOURCE" \
    --resource-group "$RG" \
    --project-name "$PROJECT_NAME" \
    --location "$LOCATION"
Once your project is built, you should be able to log into your Azure account and see it up and operational.
Building An Agent
With the Foundry project up and operational, you can build an Agent so it can be discovered within agentregistry.
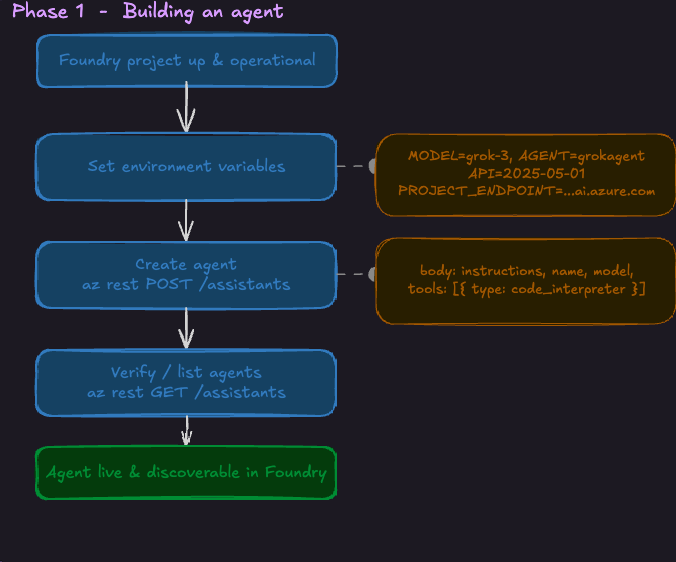
1. The environment variables below suggest you’re going to use Grok as your LLM. This is, of course, something you can change if you’d prefer to use another LLM.
MODEL_DEPLOYMENT_NAME="grok-3
AGENT_NAME="grokagent"
API_VERSION="2025-05-01"
PROJECT_ENDPOINT="https://${FOUNDRY_RESOURCE}.services.ai.azure.com/api/projects/${PROJECT_NAME}"
2. Create the Agent.
  AGENT_ID=$(az rest \
    --method post \
    --url "${PROJECT_ENDPOINT}/assistants?api-version=${API_VERSION}" \
    --resource "https://ai.azure.com" \
    --body "{
      \"instructions\": \"You are a helpful agent.\",
      \"name\": \"${AGENT_NAME}\",
      \"model\": \"${MODEL_DEPLOYMENT_NAME}\",
      \"tools\": [
        {\"type\": \"code_interpreter\"}
      ]
    }" \
    --query id \
    --output tsv)
az rest \
--method get \
--url "${PROJECT_ENDPOINT}/assistants?api-version=${API_VERSION}" \
--resource "https://ai.azure.com"
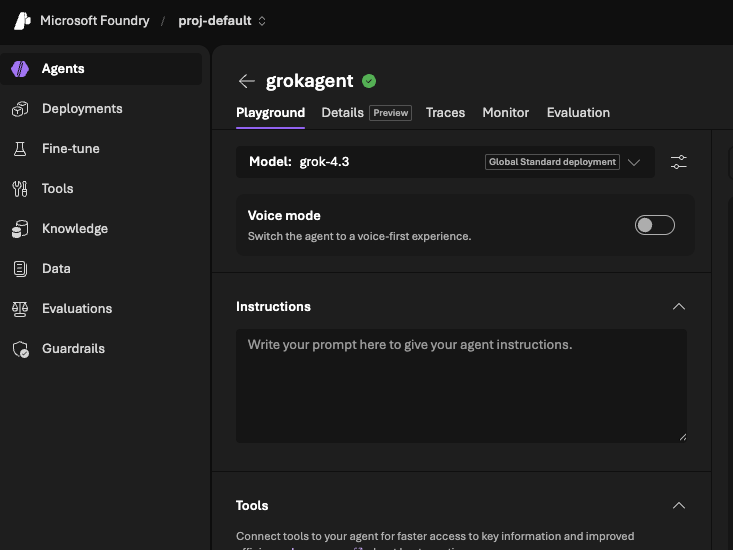
Your Agent will now appear up and operational in Foundry.
Authenticating to agentregistry
For agentregistry to have access to see Agents running in Foundry, there will need to be a sync with a role, role assignment, and user. Otherwise, agentregistry wouldn’t be able to “talk to” Azure.
To ensure proper authentication and authorization, a client secret needs to be created. In the example below, the az ad app command creates a secret for one year, which means you won’t have to rotate keys for that long. You can, of course, change the time frame.
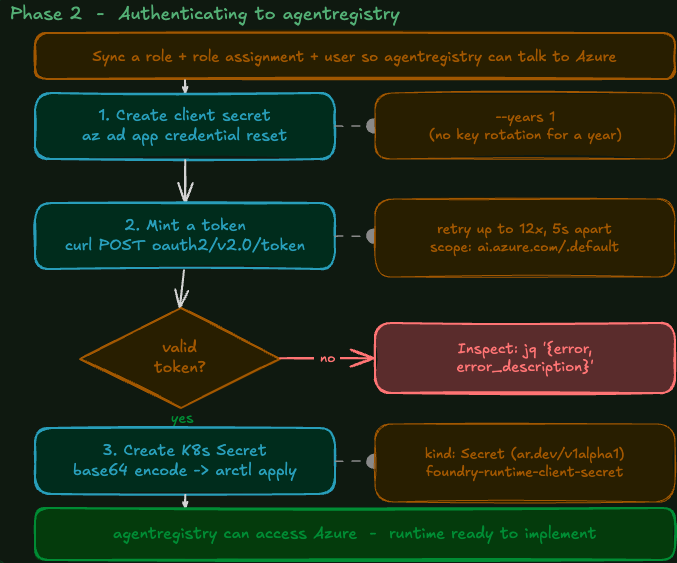
export FOUNDRY_CLIENT_SECRET=$(az ad app credential reset \
  --id "${FOUNDRY_CLIENT_ID}" \
  --display-name "${FOUNDRY_APP_NAME}" \
  --years 1 \
  --query password -o tsv 2>/dev/null)
You can then wait for the secret to propagate (this can take a few secrets) and then the secret can mint a token.
for i in {1..12}; do
  TOKEN_TEST=$(curl -sS -X POST "https://login.microsoftonline.com/${AZURE_TENANT_ID}/oauth2/v2.0/token" \
    -H "Content-Type: application/x-www-form-urlencoded" \
    --data-urlencode "client_id=${FOUNDRY_CLIENT_ID}" \
    --data-urlencode "client_secret=${FOUNDRY_CLIENT_SECRET}" \
    --data-urlencode "grant_type=client_credentials" \
    --data-urlencode "scope=https://ai.azure.com/.default")

  if [ "$(printf "%s" "${TOKEN_TEST}" | jq -r '.access_token != null')" = "true" ]; then
    echo "Foundry client secret is valid"
    break
  fi

  sleep 5
done
If the validation fails, you can test it:
printf "%s" "${TOKEN_TEST}" | jq '{error,error_description}'
Once validated, create a secret with the token.
export FOUNDRY_REGISTRY_SECRET_NAME="foundry-runtime-client-secret"
export FOUNDRY_REGISTRY_SECRET_KEY="clientSecret"

ENCODED_SECRET=$(printf "%s" "${FOUNDRY_CLIENT_SECRET}" | base64 | tr -d "\n")

cat > /tmp/foundry-client-secret.yaml <<EOF
apiVersion: ar.dev/v1alpha1
kind: Secret
metadata:
  name: ${FOUNDRY_REGISTRY_SECRET_NAME}
spec:
  type: Opaque
  data:
    ${FOUNDRY_REGISTRY_SECRET_KEY}: ${ENCODED_SECRET}
EOF

arctl apply -f /tmp/foundry-client-secret.yaml
Now that agentregistry has access to Azure, the runtime can be implemented.
Implementing The Runtime
The runtime itself can be implemented in one of two ways:
- Declaratively with
arctl. - In the agentregistry UI.
The UI allows you to add in everything you need to authenticate to your Foundry project.
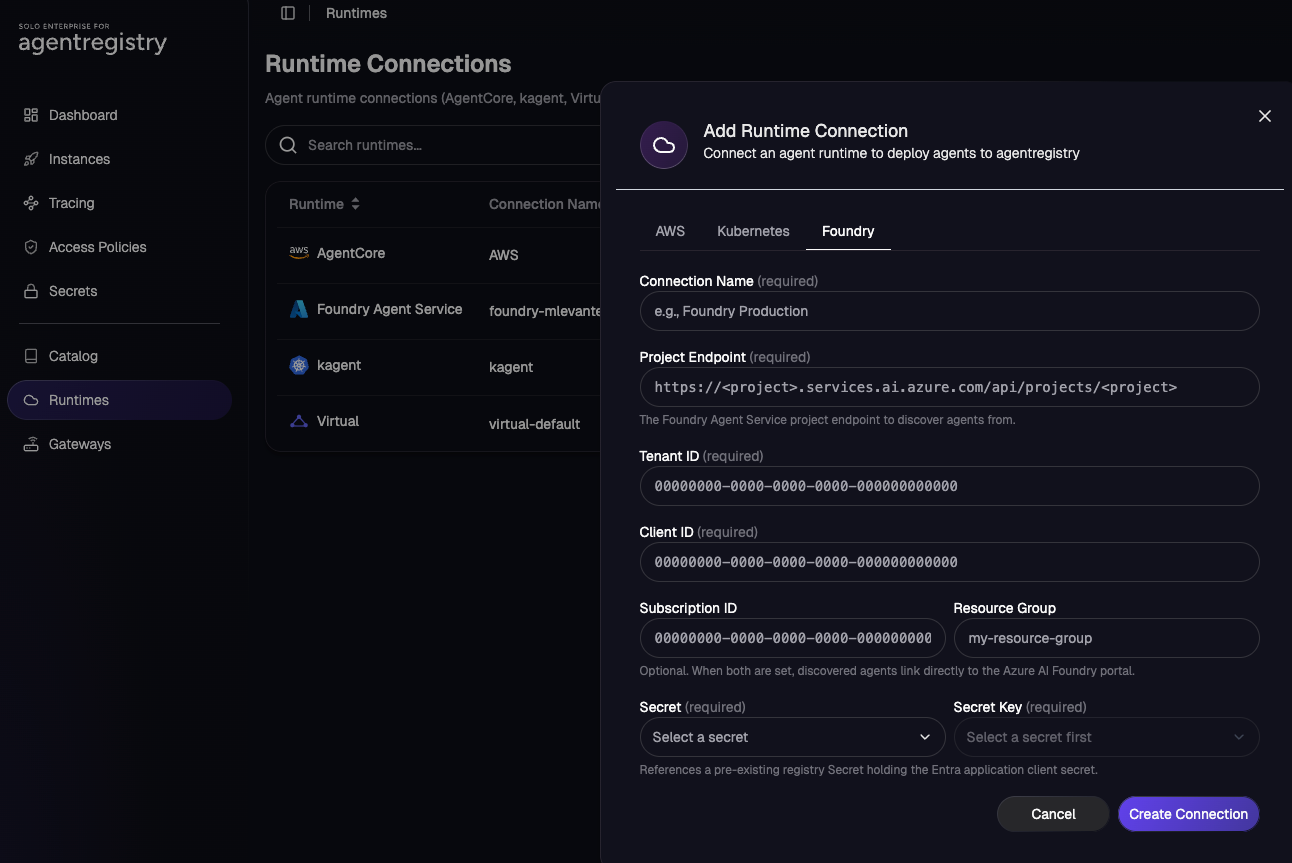
If you want a more programmatic and automated way, you can use the agentregistry Runtime object.
export FOUNDRY_RUNTIME_NAME="foundry-${FOUNDRY_ACCOUNT}"

cat > /tmp/foundry-runtime.yaml <<EOF
apiVersion: ar.dev/v1alpha1
kind: Runtime
metadata:
  name: ${FOUNDRY_RUNTIME_NAME}
spec:
  type: MicrosoftFoundry
  config:
    projectEndpoint: ${FOUNDRY_PROJECT_ENDPOINT}
    tenantId: ${AZURE_TENANT_ID}
    clientId: ${FOUNDRY_CLIENT_ID}
    subscriptionId: ${AZURE_SUBSCRIPTION_ID}
    resourceGroup: ${FOUNDRY_RESOURCE_GROUP}
    auth:
      clientSecretRef:
        name: ${FOUNDRY_REGISTRY_SECRET_NAME}
        key: ${FOUNDRY_REGISTRY_SECRET_KEY}
EOF

arctl apply -f /tmp/foundry-runtime.yaml
After the runtime is applied, you can see it via the CLI:
arctl get runtimes
Or within the UI:
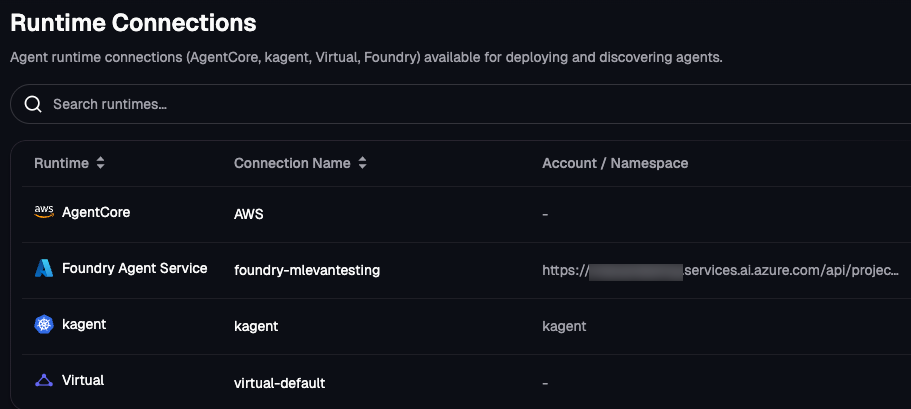
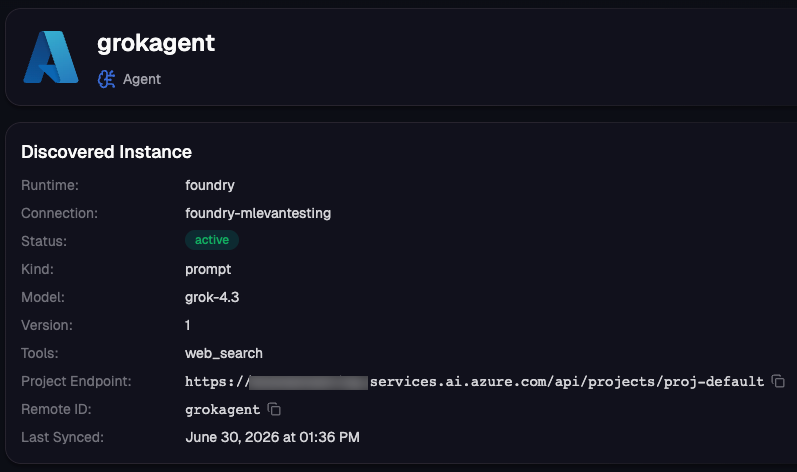
Once the sync from Foundry to agentregistry occurs, you should be able to see the Agent you created in the previous section.
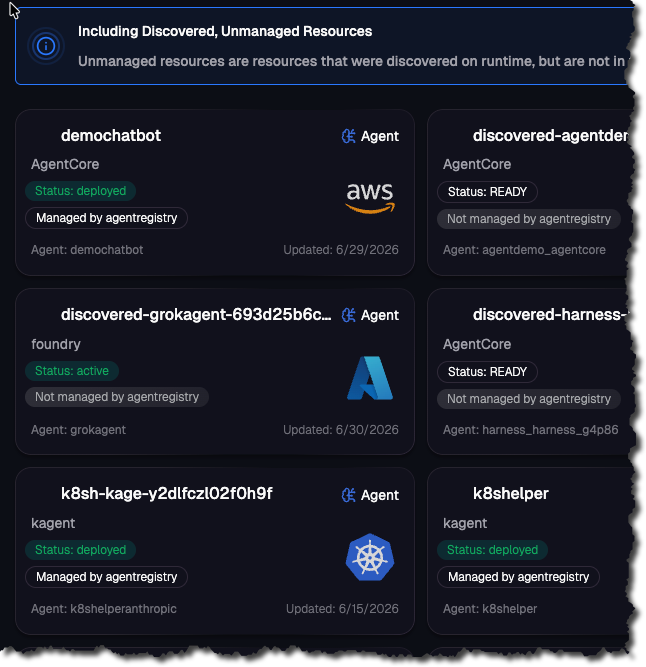
When you click on the Agent, you will be able to see its name, model, runtime, status, MCP tools attached, and project that it’s located in.
Wrapping Up
Despite how “markety” it sounds, the saying “AI is the wild west” is 100% true. The top conversation that comes up on just about every agentic call is security/governance. Because of how easily anyone from any department in an organization can create an Agent, having discoverability for what’s running within your environment across any runtime is key.
Learn more about agentregistry:


%20(1).png)


%20a%20Bad%20Idea.png)


