Every resource that’s managed, whether it’s an Agent, MCP Server, or a simple HTTP Go Web API needs the ability to scale up, scale down, and most importantly, not take up resources when it’s not being used. Typically, people get nervous about the “scale to zero” as they’re concerned with cold startup times.
But what about if there was a “warm state” instead of just “cold” or “hot”?
In this blog post, you’ll learn how to combine Agent Substrate and agentgateway to ensure warm startups on MCP Servers and route traffic to said MCP Server in a secure and observable fashion.
Prerequisites
To follow along in a hands-on fashion, you will need the following:
- A GKE or kind cluster.
- Agent Substrate installed
kubectl-ateoperational (it’s the Substrate CLI tool).ate-dev-env.shset up and configured with your environment configurations.
What's A “Warm” Startup
The “warm startup” phrasing may throw people off as it sounds buzzy, but it’s not a markety term, it’s how Agent Substrate (with gVisor or microvm) has the ability to save the state of an Actor and make it ready to be started after being in a suspended state. Substrate checkpoints its entire state (memory, open sockets, session data, object storage using sandbox snapshotting), so when a request arrives, that state is restored onto a Worker.
Here are the two things to keep in mind:
1. Warm capacity: the WorkerPool keeps a generic Pod running, so resume doesn't wait on scheduling, image pulls, or node scale-up like a Knative-style cold start would.
2. Warm state: the restore isn't a fresh boot at all. The process comes back with its RAM, open listener, and in-memory MCP session intact, which is why the same `Mcp-Session-Id` keeps working. A "cold" wake would mean re-initializing and re-handshaking, so this is closer to un-pausing than restarting.
With that, let’s dive into the hands-on portion of this blog and start some deployments.
Build and Push The MCP Server
For the ability to see an MCP Server working within a Substrate Actor, you will need a MCP Server deployed. For the purposes of this blog post, you can use the MCP Everything MCP Server, which is a great demo server to test against as it’s free and utilizes the Streamable HTTP spec.
The first step is to ensure you use the latest version of the Everything MCP Server, which fully supports `Streamable HTTP`, and prepare the container image to be pushed.
export EVERYTHING_VERSION="2026.7.4"
export EVERYTHING_GIT_SHA="6dd0a683e198783e30feabf7abaf42f925bd18b1"
export EVERYTHING_IMAGE_TAG="${KO_DOCKER_REPO}/everything-mcp:${EVERYTHING_VERSION}"

export EVERYTHING_SRC="$(mktemp -d)/servers"
git clone https://github.com/modelcontextprotocol/servers.git "$EVERYTHING_SRC"
git -C "$EVERYTHING_SRC" checkout --detach "$EVERYTHING_GIT_SHA"
test "$(git -C "$EVERYTHING_SRC" rev-parse HEAD)" = "$EVERYTHING_GIT_SHA"
You’ll see $KO_DOCKER_REPO as the environment variable for your container image registry. Feel free to change that to your actual container image registry.
Next, build and push the container image. In the example below, gcloud is being used because of GCPs Artifact Registry. However, you can push the container image to whatever registry you’d like.
cat >"$EVERYTHING_SRC/cloudbuild.everything.yaml" <<'EOF'
steps:
- name: gcr.io/cloud-builders/docker
  env:
  - DOCKER_BUILDKIT=1
  args:
  - build
  - --file
  - src/everything/Dockerfile
  - --tag
  - ${_IMAGE}
  - .
images:
- ${_IMAGE}
gcloud builds submit "$EVERYTHING_SRC" \
--project="$PROJECT_ID" \
--config="$EVERYTHING_SRC/cloudbuild.everything.yaml" \
--substitutions="_IMAGE=$EVERYTHING_IMAGE_TAG"
Because the ActorTemplate images must be immutable due to changing an image invalidates the snapshot, use the digest as an image tag.
export EVERYTHING_IMAGE_DIGEST=$(gcloud container images describe \
  "$EVERYTHING_IMAGE_TAG" --format='value(image_summary.digest)')
export MCP_IMAGE="${KO_DOCKER_REPO}/everything-mcp@${EVERYTHING_IMAGE_DIGEST}"

: "${EVERYTHING_IMAGE_DIGEST:?failed to resolve the pushed image digest}"
printf 'MCP_IMAGE=%s\n' "$MCP_IMAGE"
Deploy the MCP ActorTemplate
With the MCP Everything container image built and pushed, you can now create a namespace, a WorkerPool for the Actor to live in, and the ActorTemplate for the Actor to be deployed from.
cat <<EOF | ./hack/run-tool.sh ko apply -f -
apiVersion: v1
kind: Namespace
metadata:
  name: mcp-substrate
---
apiVersion: ate.dev/v1alpha1
kind: WorkerPool
metadata:
  name: mcp-tools
  namespace: mcp-substrate
  labels:
    workload: mcp-tools
spec:
  replicas: 1
  ateomImage: ko://github.com/agent-substrate/substrate/cmd/ateom-gvisor
  template:
    nodeSelector:
      cloud.google.com/gke-nodepool: ${SUBSTRATE_NODE_POOL}
    tolerations:
    - key: sandbox.gke.io/runtime
      operator: Equal
      value: gvisor
      effect: NoSchedule
---
apiVersion: ate.dev/v1alpha1
kind: ActorTemplate
metadata:
  name: everything-mcp
  namespace: mcp-substrate
spec:
  pauseImage: "registry.k8s.io/pause:3.10.2@sha256:f548e0e8e3dc1896ca956272154dde3314e8cc4fde0a57577ee9fa1c63f5baf4"
  containers:
  - name: mcp
    image: ${MCP_IMAGE}
    command:
    - node
    - /app/dist/index.js
    - streamableHttp
    env:
    - name: PORT
      value: "80"
  workerSelector:
    matchLabels:
      workload: mcp-tools
  snapshotsConfig:
    onPause: Full
    onCommit: Full
    location: gs://${BUCKET_NAME}/mcp-substrate/everything/
Ensure everything is up and operational:
kubectl get workerpool,actortemplate,pods -n mcp-substrateCreate The MCP Actor
You can now create an Actor with your MCP Configuration using the ActorTemplate that you created above.
- Create an `
atespace.
kubectl ate create atespace tools- Create the Actor.
kubectl ate create actor everything \
  --template mcp-substrate/everything-mcp \
--atespace tools- Ensure the Actor is up.
kubectl ate get actor everything --atespace tools
The Actor will be in a SUSPENDED state because it hasn’t been used yet. An Actor is only in a READY state when it's being used. That’s the power of Substrate and Actors, hence, the description of what a “warm” workload is. It’s ready to go, at any point, without sitting on and wasting hardware resources, and therefore, helping with cost optimization and management.
You’ll see that the address exists, everything.tools.actors.resources.substrate.ate.dev, because Substrate installs a kube-dns stub domain.
Route MCP Traffic Through A Gateway
Although you now have proper optimization of an MCP Server, you still need the ability to observe and secure it. Much like any other MCP Server, it needs guardrails, tool isolation, and security around who, or what, can use/access it. That’s where putting a gateway in front of your MCP Server comes into play.
The configuration below is like any other Gateway, HTTPRoute, and EnterpriseAgentgatewayBackend resource, but notice how the backends target is the Actors DNS name.
kubectl apply -f - <<'EOF'
apiVersion: gateway.networking.k8s.io/v1
kind: Gateway
metadata:
  name: mcp-substrate-gateway
  namespace: mcp-substrate
spec:
  gatewayClassName: enterprise-agentgateway
  listeners:
  - name: http
    protocol: HTTP
    port: 8080
    allowedRoutes:
      namespaces:
        from: Same
---
apiVersion: enterpriseagentgateway.solo.io/v1alpha1
kind: EnterpriseAgentgatewayBackend
metadata:
  name: substrate-mcp
  namespace: mcp-substrate
spec:
  mcp:
    sessionRouting: Stateful
    targets:
    - name: everything
      static:
        host: everything.tools.actors.resources.substrate.ate.dev
        port: 80
        protocol: StreamableHTTP
        path: /mcp
---
apiVersion: gateway.networking.k8s.io/v1
kind: HTTPRoute
metadata:
  name: substrate-mcp
  namespace: mcp-substrate
spec:
  parentRefs:
  - name: mcp-substrate-gateway
  rules:
  - matches:
    - path:
        type: PathPrefix
        value: /mcp
    backendRefs:
    - group: agentgateway.dev
      kind: AgentgatewayBackend
      name: substrate-mcp
---
apiVersion: enterpriseagentgateway.solo.io/v1alpha1
kind: EnterpriseAgentgatewayPolicy
metadata:
  name: substrate-actor-host
  namespace: mcp-substrate
spec:
  targetRefs:
  - group: gateway.networking.k8s.io
    kind: HTTPRoute
    name: substrate-mcp
  traffic:
    hostRewrite:
      mode: Auto
Ensure everything is up and operational:
kubectl get all -n mcp-substrate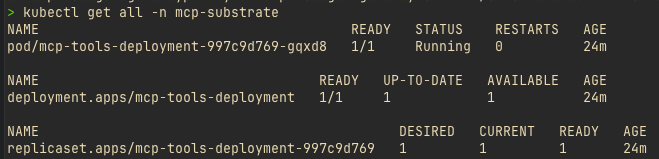
With that, it’s time to test out the Actor and see it in action.
Wake and Use The Actor
As mentioned above, an Actor is always in a suspended state until you actually use it. To wake it up, you’ll first port-forward agentgateways Gateway object so you can route traffic to it (if you have a public ALB IP for the Gateways IP, you can use that instead).
kubectl -n mcp-substrate port-forward \
  svc/mcp-substrate-gateway 8080:8080 >/tmp/pf-agw-substrate.log 2>&1 &

export PF_PID=$!
export MCP_URL=http://localhost:8080/mcp
MCP_HEADERS=(-H 'Content-Type: application/json' \
  -H 'Accept: application/json, text/event-stream')
Next, route traffic to it by calling the MCP Server.
HTTP_STATUS=$(curl -sS -D /tmp/mcp-substrate-headers.txt \
  -o /tmp/mcp-substrate-body.txt \
  -w '%{http_code}' \
  "${MCP_HEADERS[@]}" "$MCP_URL" -d '{
    "jsonrpc":"2.0",
    "id":1,
    "method":"initialize",
    "params":{
      "protocolVersion":"2025-03-26",
      "capabilities":{},
      "clientInfo":{"name":"agw-substrate-demo","version":"1.0"}
    }
  }')

printf 'HTTP %s\n' "$HTTP_STATUS"
sed -n 's/^data: //p' /tmp/mcp-substrate-body.txt > /tmp/mcp-substrate-json.txt

if [ -s /tmp/mcp-substrate-json.txt ]; then
  jq . /tmp/mcp-substrate-json.txt
else
  cat /tmp/mcp-substrate-body.txt
fi

if [ "$HTTP_STATUS" = "200" ]; then
  export MCP_SID=$(sed -n \
    's/^[Mm][Cc][Pp]-[Ss]ession-[Ii][Dd]:[[:space:]]*//p' \
    /tmp/mcp-substrate-headers.txt | tr -d '\r')

  : "${MCP_SID:?initialize succeeded but returned no MCP session ID}"
  printf 'MCP session: %s\n' "$MCP_SID"
else
  printf 'Initialization failed; inspect the response above before continuing.\n' >&2
fi
You’ll see an output similar to the below screenshot:
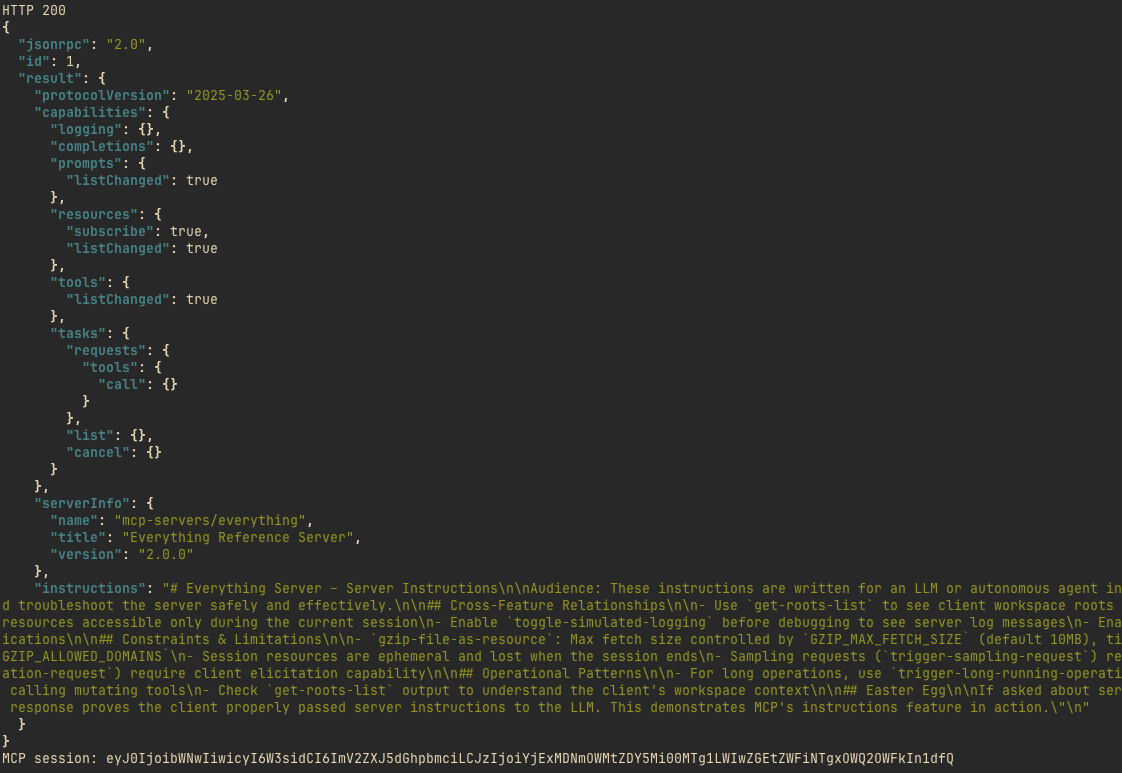
You can now see that the Actor is running and operational.

There’s also the ability to make individual tool calls as well, just like any other time you’re interacting with an MCP Server.
```
curl -sS "${MCP_HEADERS[@]}" -H "Mcp-Session-Id: $MCP_SID" \
  "$MCP_URL" -d '{
    "jsonrpc":"2.0",
    "method":"notifications/initialized"
  }' >/dev/null

curl -sS "${MCP_HEADERS[@]}" -H "Mcp-Session-Id: $MCP_SID" \
  "$MCP_URL" -d '{
    "jsonrpc":"2.0",
    "id":2,
    "method":"tools/list"
  }' | sed -n 's/^data: //p' | jq -r '.result.tools[].name'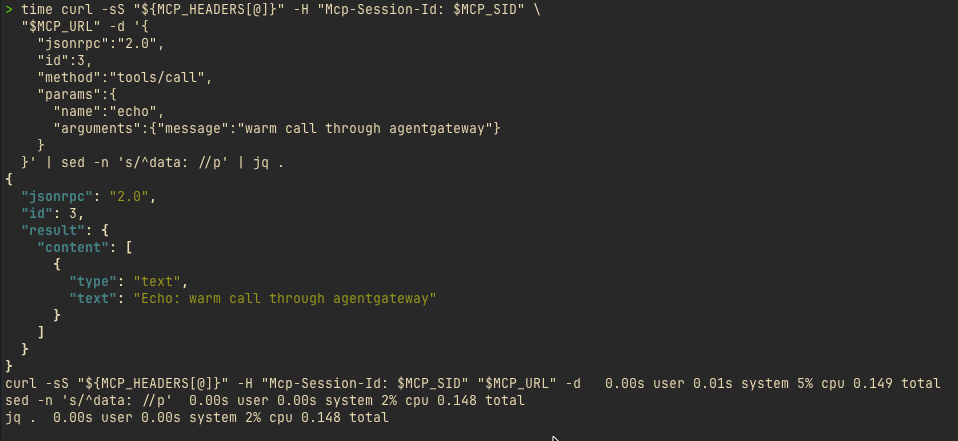
You should see tools like echo, add, and printEnv.
Traffic is now successfully flowing through agentgateway to your MCP Server running in an Agent Substrate Actor!
Learn More
Interested in learning more about Agent Substrate? Check out these resources:
- Agent Substrate on GitHub
- Kagent + Agent Substrate: Installation, Configuration, and Implementation
- Getting Started with Agent Substrate: Run AI Agents at Scale with kagent
- Agent Substrate can power agents on Kubernetes with kagent
- Kagent <3 Agent Substrate: A 101 installation & Configuration Guide



%20(1).png)







%20a%20Bad%20Idea.png)