

Autopilot is a recently announced and open-sourced project from Solo.io that gives you a framework for building opinionated operators for automated workflows on top of a service mesh. These types of workflows typically take signals or telemetry from the environment to decide what action to take next. Just like a “pilot” observes their surrounding and makes decisions on how best to guide the air plane, an autopilot automates those decisions.
At Solo.io, we believe the true power in service mesh comes from their respective programmable interfaces. Autopilot allows you to automate the service mesh interface to do interesting things like canary automation, chaos experimentation, adaptive security, and more. In the past, doing so would have been brittle, hand-crafted and bespoke. Let’s take a closer look.
Autopilot in action
Autopilot lets you define the states for your automated workflow, and generates the scaffolding for the controller that lets you plug in your business logic. With this new project, you define a new Custom Resource Definition (CRD) which will be used to configure the controller.
Autopilot init
The best way to understand Autopilot is by example. Download one of the latest releases and follow along using ap CLI.
The first thing we need to do is initialize our new project with ap init
This init step created a couple initial resources that are used to define the state-machine for our controller loop:
The key file from this list is the autopilot.yaml file which defines the Autopilot “phases” or set of states the control lop can be in. Let’s take a look:
Here we see three phases: Initializing, Processing, and Finished. If you were building a control loop for driving a canary release, you might have something like: Initializing, Waiting, Promoting, Rollback, etc with transitions from one to the other as well between each other where appropriate.
Notice in the phase definition, we specify what the inputs and outputs that will drive the parameter set that will drive the business logic behind each phase.
Autopilot generate
Once we’ve defined the phases for our control loop, we can generate the rest of the scaffolding for our project.
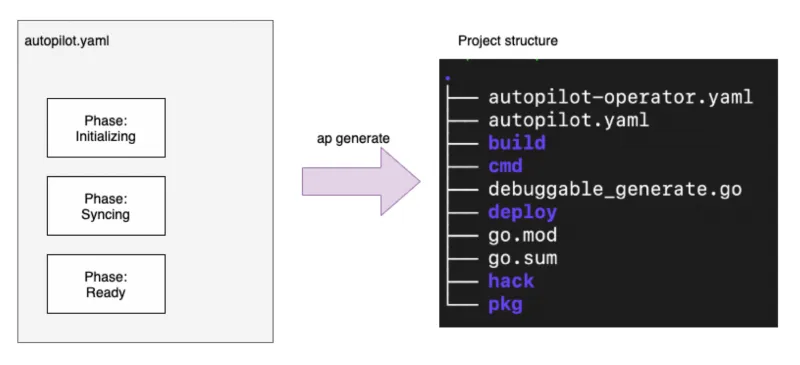
This should give our directory some generated code that becomes our controller:
There are a couple important concepts to know about once the code has been generated:
- the Spec defining your CRD
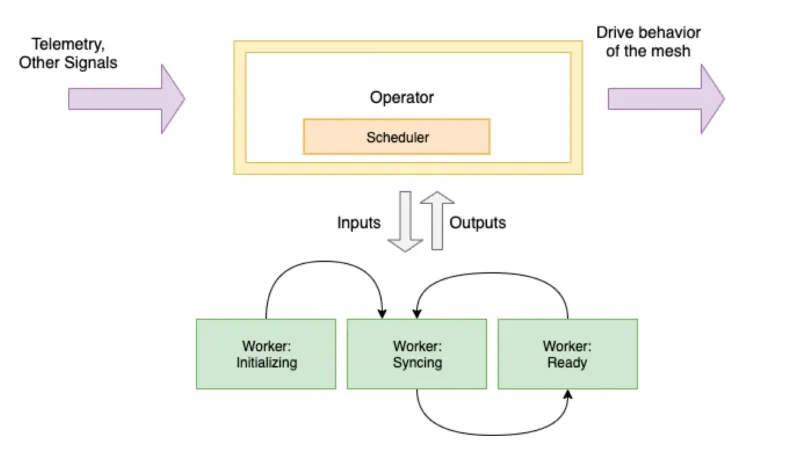
- workers for each of the defined phases
- the scheduler that coordinates the workers
In the next section, we’ll take a look at these concepts.
Implementing the brains of our controller
At this point, we have a fully functioning auto-pilot controller, but it doesn’t do much yet. The first thing we will want to do is define what the Custom Resource Definition should look like. For example, when building a Canary automation system, you may want something that specifies how to unroll the canary deployment including how frequently to do so, what telemetry to observe, and what success looks like.
Building the custom resource definition
Take, for example, the following CRD that defines some basic canary-release configurations:
To add this CRD to our project, we need to fill in the $BASE/pkg/apis/example/v1/spec.go file. Right now it looks like this:
To build the CanaryDeployment CRD, we could add something like this:
Building the workers
Now that we’ve specified the CRD that will drive the canary automation control loop, we need to fill in the custom code for each one of the phases and the transitions between phases.
If we look in $BASE/pkg/workers we see packages for each of the phases we defined in the autopilot.yaml before generating the code for our project. Once we generated the code, we have stubs for the workers. For example, in the worker for the Initializing phase, we see:
We can fill in the details of our workers making sure to respect the inputs and outputs that we defined in the autopilot.yaml file. When we return from a worker, we also want to pass back the next phase that should be triggered, or a reference to the current phase to indicate not transition needs to take place.
In the accompanying video demo, we explore building the workers.
Exploring the scheduler
The scheduler implements the controller-runtime Reconcile() function which watches the CRD and runs a reconciliation against any of the changes. The scheduler determines the current phase and calls the workers. The workers return the next phase, if applicable, and the scheduler calls the next worker. This continues until the control loop reaches the final phase. Here’s an example of the auto-generated scheduler for the Initializing phase:
Note, the scheduler is auto-generated and is not intended to be edited by had. The code is influenced by the autopilot.yaml inputs and outputs specified for each phase.
Once we’ve filled in the workers, we can build and deploy the project with ap build and ap deploy. See the accompanying videos to see how this works.
Follow along with demo!
In this series of videos, we walk through each of these steps and build a new controller using auto-pilot that builds a Canary Automation controller for Istio:
https://www.youtube.com/watch?v=cD74L8cPeBY
https://www.youtube.com/watch?v=5DPs9zksBJg
https://www.youtube.com/watch?v=hcfSHFslo1
https://www.youtube.com/watch?v=h3HUFMP_ej8
For more:
See the following resources for more:


%20(1).png)


%20a%20Bad%20Idea.png)


