
An Istio user recently approached us with questions that we at Solo.io frequently hear from enterprises embarking on Day 2 of their service mesh journey. In this post, we’ll focus on this one:
“We’ve experienced challenges in scaling our organization to support multiple application groups using community Istio. How can Gloo Platform help us with multi-tenancy?”
The purpose of this post is to present a simple example illustrating Gloo Platform‘s support for multi-tenancy and how it can lead to better results when managing the configuration of multiple project teams, as compared with basic open-source Istio.
Prerequisites for Following Along
If you’d like to follow along with this example in your own environment, you’ll need a Kubernetes cluster and associated tools, plus an installation of Gloo Platform. We ran the tests in this blog on Gloo Platform v2.3.4 with Istio v1.17.2. We hosted all of this on a local instance of k3d v5.4.3. (We’ll provide a single-command installer that will allow you to set up and later tear down all the infrastructure on a local workstation.)
You’ll need a license key to install Gloo Platform if you don’t already have one. You can obtain a key by initiating a free trial.
For this exercise, we’ll also use some common CLI utilities like kubectl, curl, and git. Make sure these prerequisites are all available to you before jumping into the next section. I’m building this on MacOS but other platforms should be perfectly fine as well.
Clone GitHub Repo
The resources required for this exercise are available in the gloo-gateway-use-cases repo on GitHub. Clone that to your workstation and switch to the gloo-gateway-use-cases example directory. We’ll primarily be using the resources in the cloud-migration example.
Install Gloo Platform
As this is a getting-started example with Gloo Platform, you’ll only need a single k8s cluster active. However, if you already have multiple clusters in place, you can certainly use that configuration as well.
If you don’t have Gloo Platform installed, there is a simplified installation script available in the GitHub repo you cloned in the previous section. Before you walk through that script, you’ll need three pieces of information.
- Place a Gloo license key in the environment variable
GLOO_GATEWAY_LICENSE_KEY. If you don’t already have one of these, you can obtain it from your Solo account executive. - Supply a reference to the repo where the hardened Solo images for Istio live. This value belongs in the environment variable
ISTIO_REPO. You can obtain the proper value from this location once you’re a Gloo Mesh customer or have activated a free trial. - Supply a version string for Gloo Mesh Gateway in the environment variable
GLOO_MESH_VERSION. For the tests we are running here, we usev2.3.4.
If you’ve never installed any Gloo Platform technology before, you will need to import a Gloo Platform helm chart before the installation script below will work properly.
Now from the gloo-gateway-use-cases directory at the top level of the cloned repo, execute the setup script below. It will configure a local k3d cluster containing Gloo Platform and an underlying Istio deployment. The script will fail if any of the three environment variables above is not present.
The output from the setup script should resemble what you see below. If you require a more complex installation, a more complete Gloo Platform installation guide is available here.
Note that while we’ve set up Gloo Platform to support this entire exercise, Istio is installed as part of that. So for the initial example, we will be using community Istio only.
Istio Example
The purpose of this simple example is to demonstrate a small sample of the issues that can arise when scaling Istio to a larger, multi-tenant environment. In particular, we’ll show the following:
- Unreachable routes for some services;
- Non-deterministic behavior for certain scenarios; and
- Unexpected routing when virtual service changes occur.
For both the Istio and Gloo Platform examples, we will simulate an environment where three teams need to cooperate in order to support a suite of application services.
- An operations team responsible for the platform itself (
ops-team); and - Two application teams (
app-1andapp-2) responsible for their own sets of services.
Spin Up the Base Services
We’ll establish a Kubernetes namespace ops-team to hold configuration owned by Operations. Then we will establish separate namespaces with a service instance for each of the application teams, app-1 and app-2. The services for each team are based on the Fake Service to keep this example as simple as possible. Fake Service instances simply respond to requests with pre-configured messages.
Establish an Istio Gateway
Configure an Istio `Gateway` listening on port 80 for the host `api.example.com`.
Establish an Istio Virtual Service
We’ll configure two separate VirtualServices on our Gateway, one for each of our imaginary application teams. Each of these VSes will have two routes, one that matches on a specific URL prefix and another catch-all route for all other requests. Establishing default routes on VSes is considered an Istio best practice.
Let’s establish the VirtualService for just app-1 now:
Test the App1 Service
With a single tenant, there is no unexpected behavior. Whether we exercise the `/foo` route or the default route, our VS behaves as expected.
Note that the /foo route goes to app-1 as expected:
Configure and Test a Second VirtualService
Note that this scenario takes a turn toward the unexpected as soon as we simulate a second project team introducing a second VS in a second namespace, but listening on the same `api.example.com` host. In this case, we establish valid routes that capture requests for `/bar` and also a default route. Istio accepts this configuration without errors, but the ambiguity for the default routes creates a problem. Let’s establish the second VS:
But while the /bar route behaves as expected and sends traffic to app-2…
…It’s as if the default route on app-2 doesn’t exist. Now that we’re working in a “shared environment”, those requests that team2 expect to be routed to their app go to app-1 instead. And there’s no indication of an error in the Gateway or VirtualService resources.
WHAT?!? Team2 sees its expected requests route to app-1:
What’s REALLY Happening Here?
Why is Istio ignoring the default route for our team2? This is actually a documented Istio limitation. In cases like this where multiple tenants define similar routes across VirtualService resources, Istio chooses its route based on which one has been in existence the longest. We can see this by deleting the app-1 VS and then re-applying it. Taking this step-by-step:
- Delete
app-1VS and note that the default route now sends traffic toapp-2as expected.
- Now add back the
app-1VS and note that the default route does not restart sending traffic toapp-1; it insteads goes toapp-2(because that is now the “older” of the two routes).
So we conclude that there are a couple of potential issues.
- Routes can be “lost” when there are
VirtualServiceconflicts between resources, even with as few as two tenants. - Race conditions between
VirtualServiceresources, say in parallel branches of CI/CD pipelines, can result in the same logical configurations exhibiting different routing behaviors, non-deterministically, and without any indication of a problem.
While there are certainly techniques to manage these scenarios in open-source Istio, we would like to avoid them altogether with tenant-friendly configuration patterns like routing delegation. Let’s see how we might approach this with a value-added layer like Gloo Platform.
Manage Multiple Tenants with Gloo Platform
We will use the same example services to build our Gloo Platform example. But we will use a technique called delegation to help us manage the complexity of multi-tenancy. You can read more about Solo’s support for multi-tenancy here.
First, we’ll remove the Istio configurations from the previous exercise.
Second, we’ll use a Gloo Platform CRD called Workspace to lay down Kubernetes boundaries for multiple teams within the organization. These Workspace boundaries can span both Kubernetes clusters and namespaces. In our case we’ll define three Workspaces, one for the ops-team that owns the overall service mesh platform, and two for the application teams, app1-team and app2-team, to whom we want to delegate routing responsibilities.
Below is a sample Workspace and its companion WorkspaceSettings for the app1-team. Note that it includes the app-1 Kubernetes namespace across all clusters. While there is only a single cluster present in this example, this Workspace would dynamically expand to include that same namespace on other clusters added to our mesh in the future. Note also that via the WorkspaceSettings, tenants can choose precisely what resources they are willing to export from their workspace and who is able to consume them. See the API reference for more details on workspace import and export.
Let’s apply the `Workspace` definitions now:

Establish a Virtual Gateway and Routing Rules
The third step in our process of demonstrating multi-tenancy with Gloo Platform is to lay down a VirtualGateway that selects the Istio Ingress Gateway on our cluster and delegates traffic to RouteTables (another Gloo Platform abstraction) that are owned by the ops-team.
This diagram below depicts how the VirtualGateway and RouteTable resources manage traffic in Gloo Platform.
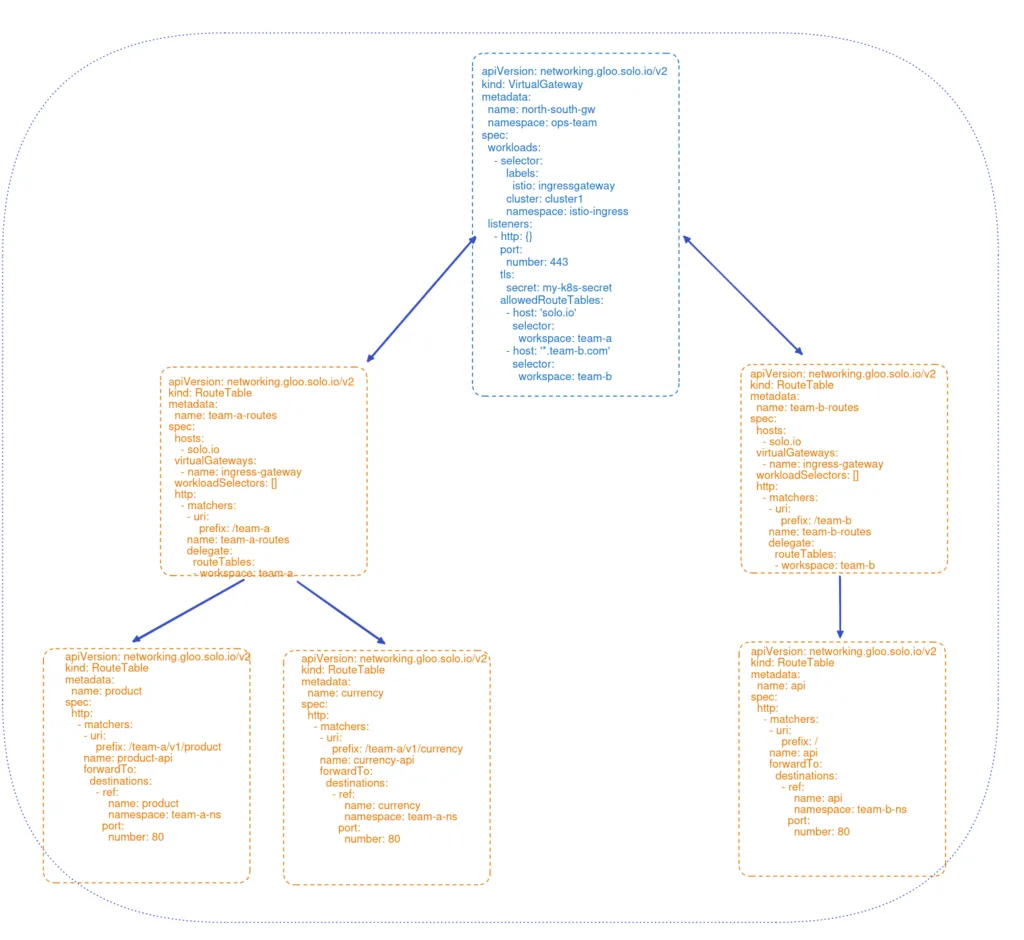
Fourth, we’ll establish RouteTables. This is the heart of Gloo’s multi-tenant support. The first set of RTs are owned by the ops-team select the gateway established in the previous step. These RTs intercept requests with a prefix designated for their respective teams, /team1 and /team2, and then delegate to other RTs that are owned exclusively by those teams.
Fifth, we’ll configure RouteTables that are owned entirely by the application teams. They establish routes that are functionally identical to what we built in the Istio-only example, including with default routes for each team’s app. These led to the multi-tenancy issues we observed in the original example. But now, because they are deployed in delegated RTs, the default / routes no longer introduce any ambiguity or risk of race conditions in determining which route is appropriate.
This is an example of one of the RouteTables owned by an application team.
By using an intermediate delegating RT, we have completely removed the risk of conflicting routes from multiple tenants leading to confusion in Istio’s routing choices.
Test the Gloo Services
Now Gloo route delegation allows application teams to operate independently with their routing decisions. Requests for either team1 or team2 are routed exactly as expected. Let’s prove this out with a couple of curl commands. The first routes a request that would have previously triggered a conflict to the app-1-default service as expected.
The second test routes to the app-2-default service, again just as expected.
Multi-Tenant Observability
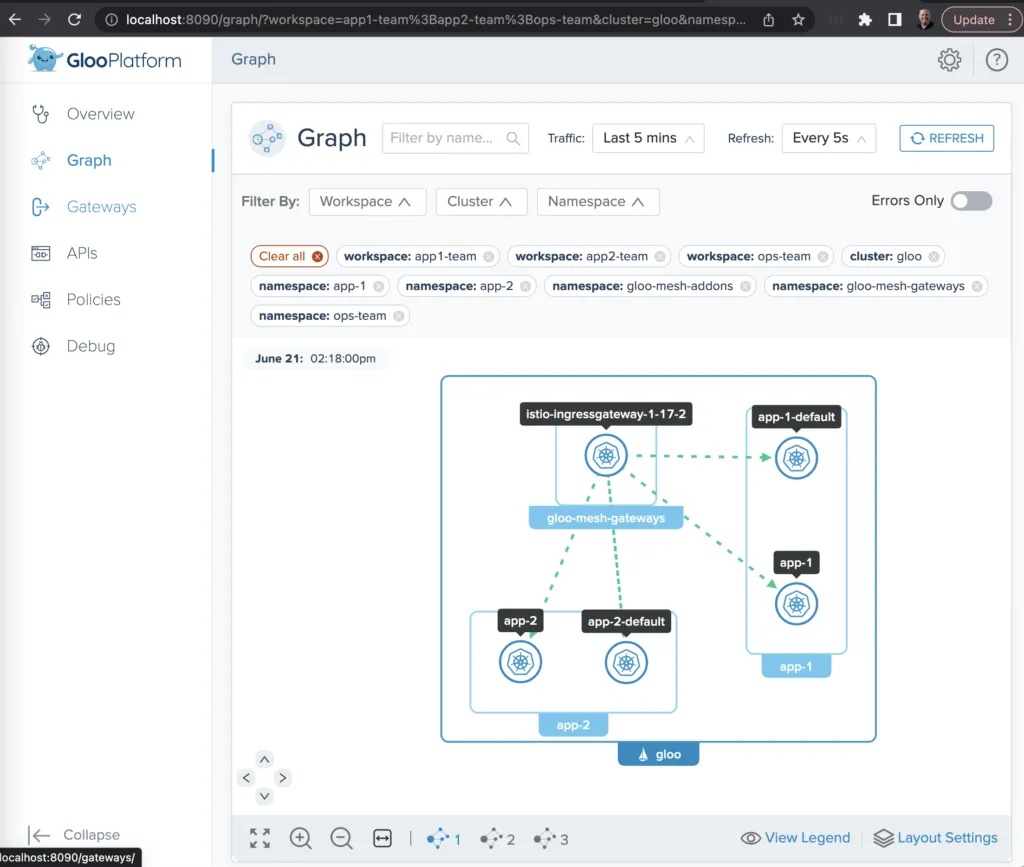
In addition to supporting unambiguous multi-tenant routing, Gloo Platform also allows you to observe what’s happening among the tenants of your service mesh. A convenient way to visualize traffic flows and debug using Gloo Platform is to use the flow graph bundled with the Gloo Platform UI. (These metrics can also be forwarded to your favorite SIEM tool for storage and analysis.) An easy way to enable this at development time is to activate the Gloo Platform dashboard, like this:
This should open a browser tab pointed at http://localhost:8090. Switch to Graph on the left navigation menu. Next to the Filter By: label, be sure to select all Workspaces, all Clusters, and all Namespaces. After a few seconds to allow for telemetry collection and processing, you’ll see a graph like the one below. It shows you the traffic moving between the ingress gateway and the four services we established, across all three workspaces. (You may also want to fire off a few additional curl commands like the one above to the gateway endpoint in order to make the statistics slightly more interesting.)
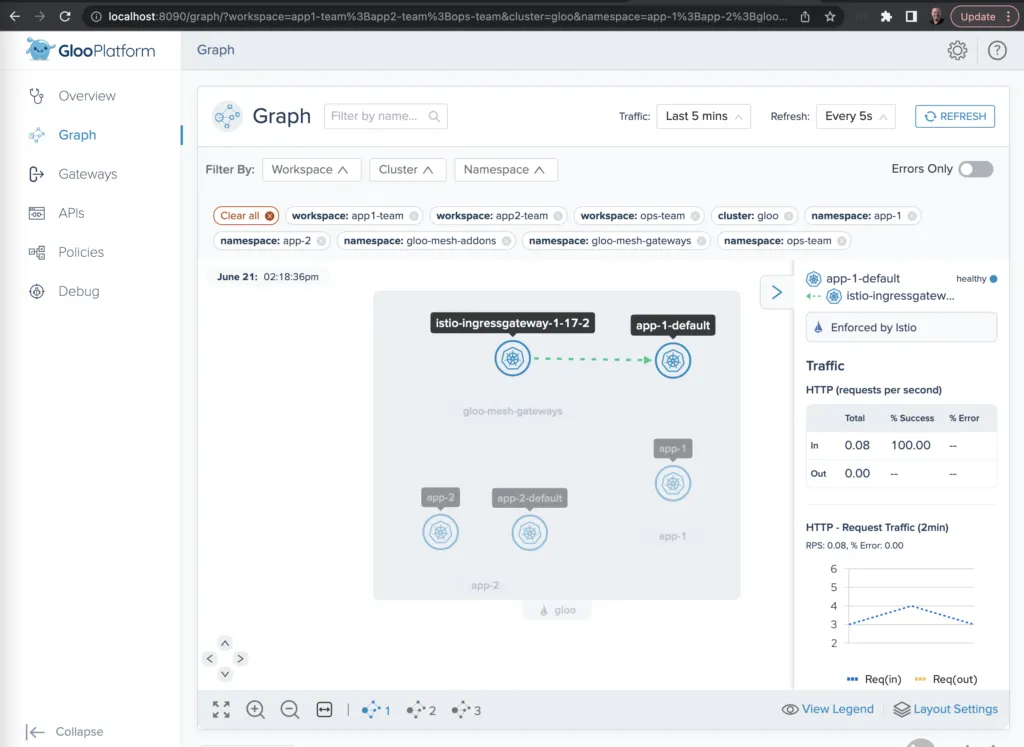
You can also select individual services to drill down on each one’s usage metrics, error rates, and the like.
Exercise Cleanup
If you used the setup.sh script described earlier to establish your Gloo Platform environment for this exercise, then there is an easy way to tear down the environment as well. Just run this command:
Learn More
In this blog post, we took an introductory tour of service mesh multi-tenancy features using Gloo Platform. All resources used to build the example in this post are available on GitHub.
Do you want to explore further how Solo and Gloo Platform can help you migrate your workloads to the cloud with best practices for traffic management, zero trust networking, and observability?
- Find hands-on training resources for both Gloo Platform and its underlying open-source components at Solo Academy
- Explore the full Gloo Platform documentation here
- Reach out to Solo experts on the Solo.io Slack community and particularly the #gloo-mesh channel
- Request a live demo or trial
- See video content on the solo.io YouTube channel


%20For%20More%20Dependable%20Humans.png)


