What is Istio?
Istio is an open source service mesh technology that enables developers to connect, secure, and monitor microservices. It is a platform agnostic solution supporting microservices written using any programming language or framework. While Istio is primarily used in containerized environments and Kubernetes clusters, it can also manage service interactions between virtual machine (VM)-based workloads.
One of Istio’s main goals is to help development teams achieve observability and consistent interaction between services in a large containerized microservices architecture. Traditionally, developers addressed these concerns by building communication logic into each microservice, or using language-specific client libraries, but this is inefficient and breaks down at scale. Istio provides an infrastructure layer between application services and the network, providing a unified way to control the entire microservices application.
Quick Start Tutorial: Deploying Istio in Your Kubernetes Cluster
Below we explain how to deploy Istio step-by-step. If you prefer to learn via an interactive course, check out Solo.io’s free, hands-on course, Getting Started with Istio.
Related content: Read our guide to using Istio with Kubernetes (coming soon)
Download and Install Istio
To download and install Istio:
1. Use the following command on the command line interface to download the latest Istio release and extract it automatically:curl -L https://istio.io/downloadIstio | sh -
2. Navigate to the extracted directory with the following command:cd istio-1.14.1
This tutorial downloaded the 1.14.1 version of Istio and navigates to the istio-1.14.1 directory.
3. Use the following command to add the istiocl client present in the istio-1.14.1 directory to your path:\export PATH=$PWD/bin:$PATH
4. This tutorial uses Istio’s demo configuration file to set it up. Use the following command to install the demo configuration:istioctl install --set profile=demo -y
5. Use the following command to add a namespace:kubectl label namespace demo-namespace istio-injection=enablednamespace/default labeled
When the application gets deployed later, Istio will automatically inject Envoy sidecar proxies since we provided the namespace.
Deploy a Tutorial Istio Application
This tutorial will deploy Istio’s sample application called BookInfo as an example.
To deploy an application through Istio:
1. Use the following command to deploy the application:kubectl apply -f samples/bookinfo/platform/kube/bookinfo.yaml
2.Use the following commands to confirm services and pods are getting deployed:kubectl get serviceskubectl get pods
3. Use the command to confirm the application is running smoothly and serves HTML pages:kubectl exec "$(kubectl get pod -l app=ratings -o jsonpath='{.items[0].metadata.name}')" -c ratings -- curl -sS productpage:9080/productpage | grep -o "<title>.*</title>"
This command will show the title of the HTML page as a response.
Allow Outside Traffic to the Application
The BookInfo application cannot be accessed from the outside even though it is deployed. An Istio Ingress Gateway is needed to enable access from the outside as it maps a route to the edge of the Istio’s mesh.
To allow outside traffic to your Istio application:
1. Connect the deployed application with the Istio gateway with the following command:kubectl apply -f samples/bookinfo/networking/bookinfo-gateway.yaml
2. Use the following command to ensure the configuration has no issues:istioctl analyze
Setting the Ingress Ports and IP And Viewing External Access
To determine the Ingress ports and IP for sending traffic:
1. Use the following command to initiate a Minikube tunnel that will route traffic to the Istio Ingress Gateway:minikube tunnel
This command provides an external load balancer named EXTERNAL-IP.
2. Use the following command to set the Ingress ports and hosts:export INGRESS_HOST=$(kubectl -n istio-system get service istio-ingressgateway -o jsonpath='{.status.loadBalancer.ingress[0].ip}')export INGRESS_PORT=$(kubectl -n istio-system get service istio-ingressgateway -o jsonpath='{.spec.ports[?(@.name=="http2")].port}')export SECURE_INGRESS_PORT=$(kubectl -n istio-system get service istio-ingressgateway -o jsonpath='{.spec.ports[?(@.name=="https")].port}’)
3. Use the following commands to ensure the right environment variables are set:echo "$INGRESS_HOST"echo "$INGRESS_PORT"echo "$SECURE_INGRESS_PORT"
4. Use the following commands to set the GATEWAY_URL environment variable and confirm a successful assignment:export GATEWAY_URL=$INGRESS_HOST:$INGRESS_PORTecho "$GATEWAY_URL"
5. Use the following command to get the external access command for the Bookinfo application:echo "http://$GATEWAY_URL/productpage"
This command will output a URL to be pasted in a browser to access the application..
View the Dashboard
Istio allows integration with different telemetry applications that help understand the service mesh’s structure and display its topology and health.
To view the Istio application’s dashboard:
1. Use the following commands to install and deploy Kiali and other relevant addons:kubectl apply -f samples/addonskubectl rollout status deployment/kiali -n istio-system
2. Use the following command to access the Kiali dashboard:istioctl dashboard kiali
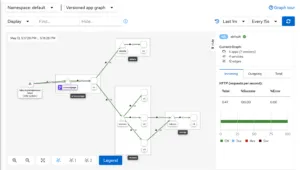
Once the dashboard displays, select Graph. Then, select default after opening the Namespace dropdown. Finally, the dashboard shows the mesh’s overview and how services in the Bookinfo applications are related, as shown in the image below.
3 Istio traffic management examples
Traffic management on Istio is implemented through dedicated traffic routing rules. Once all traffic to the application is monitored, the chances of failures lessen. An Envoy proxy configured by Istio monitors all the traffic to and from the application pod.
The Envoy proxy is configured to run alongside the application container. This way, the application service can function while the traffic monitoring gets proxied through the proxy.
Read our blog: Istio Networking in Depth
1. Istio Virtual Service
An Istio Virtual Service enables users to create rules for routing traffic. These rules become helpful for the application as it hits the load balancer. First, the rules and the corresponding end service matching protocols get defined. Then, if the rule fits the criteria, the traffic gets diverted to the end service.
Istio Virtual Service also enables users to decouple incoming service requests using traffic routing rules. Users can maintain and specify incoming traffic from different hostnames in the same Virtual Service configuration.
Here is an example of a Virtual Service configuration:
apiVersion: networking.istio.io/v1alpha3kind: VirtualServicemetadata: name: tutorial-vs-configspec: hosts:—tutorial-config.vs.com http:—match: —headers: end-user: exact: /api route: —destination: host: /
Here, the spec.hosts part includes the application’code CNAME or domain. The http part specifies the HTTP routing. It configures the code backend services to a specific host or destination.
As soon as the hosts entry is matched, it enters the match part in http. If the match part gets satisfied, the route.destinationTraffic management on Istio is implemented through dedicated traffic routing rules. Once all traffic to the application is monitored, the chances of failures lessen. An Envoy proxy configured by Istio monitors all the traffic to and from the application pod.
The Envoy proxy is configured to run alongside the application container. This way, the application service can function while the traffic monitoring gets proxied through the proxy.
Read our blog: Istio Networking in Depth
1. Istio Virtual Service
An Istio Virtual Service enables users to create rules for routing traffic. These rules become helpful for the application as it hits the load balancer. First, the rules and the corresponding end service matching protocols get defined. Then, if the rule fits the criteria, the traffic gets diverted to the end service.
Istio Virtual Service also enables users to decouple incoming service requests using traffic routing rules. Users can maintain and specify incoming traffic from different hostnames in the same Virtual Service configuration.
Here is an example of a Virtual Service configuration:
apiVersion: networking.istio.io/v1alpha3kind: VirtualServicemetadata: name: tutorial-vs-configspec: hosts:—tutorial-config.vs.com http:—match: —headers: end-user: exact: /api route: —destination: host: /
Here, the spec.hosts part includes the application’code CNAME or domain. The http part specifies the HTTP routing. It configures the code backend services to a specific host or destination.
As soon as the hosts entry is matched, it enters the match part in http. If the match part gets satisfied, the route.destination entry code where it will route to the traffic.
2. Istio Gateway
Istio Gateway enables you to monitor and control incoming and outgoing traffic globally. There is the option of specifying the nature of the traffic a user wants to allow to enter the Istio service mesh through protocols and rules. The traffic then gets further routed to its destination.
Here is an example that shows how the Istio Gateway works:
apiVersion: networking.istio.io/v1alpha3kind: Gatewaymetadata: name: tutorial-istio-gtwyspec: selector: app: tutorial-app servers:—port: number: 344 name: https protocol: HTTPS hosts: —tutorial-gateway.vs.com tls: mode: SIMPLE credentialName: tutorial-cert-tls
Here is the workflow of the above Istio Gateway configuration:
- The traffic hits the application’s load balancer and gets routed to the gateway.
- Gateway lets the traffic enter the Istio service mesh over the port mentioned above in port.number. In this case, it is 344.
- At this stage, there is no traffic routing to the backend service.
- Gateway uses the TLS secret credential to certify the CNAME’s credibility.
- Once it certifies it, the gateway lets the traffic from the host in, and then the virtual service routes it to the destination service.
3. Istio Sidecars
Users can also manage and limit the traffic reaching the application’s Envoy proxies through Istio Sidecars. This option involves Istio configuring Envoy proxy, which can accept traffic. This traffic accepts traffic that is incoming from the application’s Workload.
Here is an example to demonstrate the working of Istio Sidecars:
apiVersion: networking.istio.io/v1alpha3kind: Sidecarmetadata: name: tutorial-sidecar namespace: defaultspec: egress:—hosts: —"./*" —"bookinfo/*"
This example configuration applies a sidecar to the default namespace. The egress specifies that the configuration only allows external traffic to reach only specific backend services. In this case, they are the default and bookinfo namespaces, specified by “./*” and “bookinfo/*”. Hence, the traffic’s accessibility to other namespaces gets restricted. entry code where it will route to the traffic.
2. Istio Gateway
Istio Gateway enables you to monitor and control incoming and outgoing traffic globally. There is the option of specifying the nature of the traffic a user wants to allow to enter the Istio service mesh through protocols and rules. The traffic then gets further routed to its destination.
Here is an example that shows how the Istio Gateway works:
apiVersion: networking.istio.io/v1alpha3kind: Gatewaymetadata: name: tutorial-istio-gtwyspec: selector: app: tutorial-app servers:—port: number: 344 name: https protocol: HTTPS hosts: —tutorial-gateway.vs.com tls: mode: SIMPLE credentialName: tutorial-cert-tls
Here is the workflow of the above Istio Gateway configuration:
- The traffic hits the application’s load balancer and gets routed to the gateway.
- Gateway lets the traffic enter the Istio service mesh over the port mentioned above in port.number. In this case, it is 344.
- At this stage, there is no traffic routing to the backend service.
- Gateway uses the TLS secret credential to certify the CNAME’s credibility.
- Once it certifies it, the gateway lets the traffic from the host in, and then the virtual service routes it to the destination service.
3. Istio Sidecars
Users can also manage and limit the traffic reaching the application’s Envoy proxies through Istio Sidecars. This option involves Istio configuring Envoy proxy, which can accept traffic. This traffic accepts traffic that is incoming from the application’s Workload.
Here is an example to demonstrate the working of Istio Sidecars:
apiVersion: networking.istio.io/v1alpha3kind: Sidecarmetadata: name: tutorial-sidecar namespace: defaultspec: egress:—hosts: —"./*" —"bookinfo/*"
This example configuration applies a sidecar to the default namespace. The egress code specifies that the configuration only allows external traffic to reach only specific backend services. In this case, they are the default and bookinfo namespaces, specified by "./*" and "bookinfo/*". Hence, the traffic’s accessibility to other namespaces gets restricted.
Learning more about istio
For users that are new to Istio or want to gain advanced knowledge, we recommend the workshops and certifications offered in Solo.io Academy. These provide access to hands-on tutorials, as well as access to knowledgeable Istio engineers who can directly answer questions.
Want to continue your education and learn about:


%20For%20More%20Dependable%20Humans.png)


