Istio ambient mesh is a new, open source data plane deployment model that doesn’t use sidecar proxies. Instead, it uses a per-node component called ztunnel for mTLS, identity, and L4 traffic management and a waypoint proxy (Envoy instance) for L7 traffic management. The new data plane deployment mode does all this without sacrificing any of the zero trust security, telemetry, and traffic management features built into Istio.
In traditional service mesh deployments, sidecar proxies are part of the data plane and run alongside every application in the service mesh. The sidecar proxies manage and monitor applications’ inbound and outbound network traffic.
In this series of blog posts, I will explain the details of different components involved in traffic routing and look at the different redirection mechanisms as well as the configuration that’s needed to make everything work in the ambient mesh.
In the first part, I will cover how the sidecar proxies are configured and what role the Istio CNI plays.
You can also watch the accompanying video here.
How is the sidecar proxy configured?
By default when deploying applications into namespaces where Istio injection is enabled or when manually injecting the sidecar, an init container called istio-init takes care of configuring iptables inside the Kubernetes pods. This configuration ensures inbound and outbound traffic to the pod gets intercepted by the sidecar proxy.
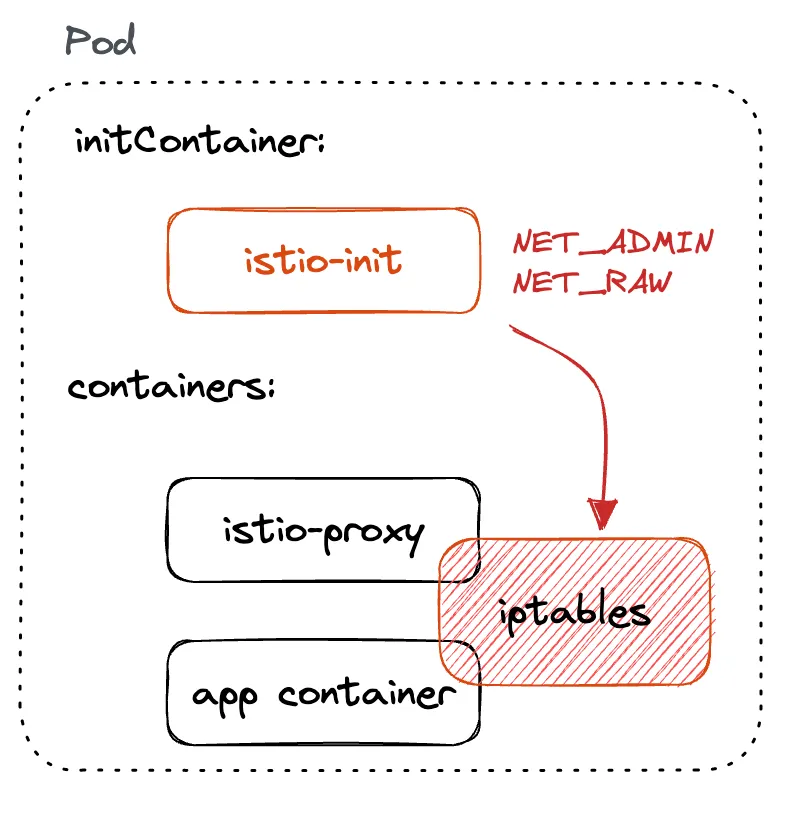
One of the downsides of the istio-init container is that to set up iptables, the container requires NET_ADMIN and NET_RAW capabilities.
NET_ADMIN capability gives the permissions to administer the IP firewall and modify the routing tables, while the NET_RAW capability allows opening and using RAW sockets and binding to any address for transparent proxying.
To deploy the containers with these capabilities, one must have sufficient Kubernetes RBAC permissions. As one can imagine, elevated permissions for deploying applications aren’t necessarily desirable as they can pose security risks.
Kubernetes supports Container Network Interface (CNI) plugins that allow writing plugins for configuring network interfaces in Linux containers. The container runtime in Kubernetes communicates with one or more CNI plugins and can send one of the four operations, ADD, DEL, CHECK, and VERSION, as per the CNI specification.
These operations are invoked to add network interfaces to the containers (ADD), to remove containers from the network (DEL), to periodically check whether the network is still set up the way it should be (CHECK), and to ask for plugins’ version (VERSION).
What is Istio CNI?
Istio CNI plugin replaces the istio-init container and functionally accomplishes the same thing as istio-init init container. The difference between the two is that while the Istio CNI plugin still requires elevated Kubernetes RBAC permissions, the application pods don’t anymore.
As Istio CNI can be used in the sidecar and ambient, I will first focus on how it works and then later explain what it specifically does when ambient is enabled. For the non-ambient mesh, the functionality of the Istio CNI is the same as with the istio-init container.
Installing Istio with CNI enabled is controlled through the cni setting in the IstioOperator as shown below:
Note that some platforms require additional settings, which you can read about in the Hosted Kubernetes settings section of the Istio CNI documentation.
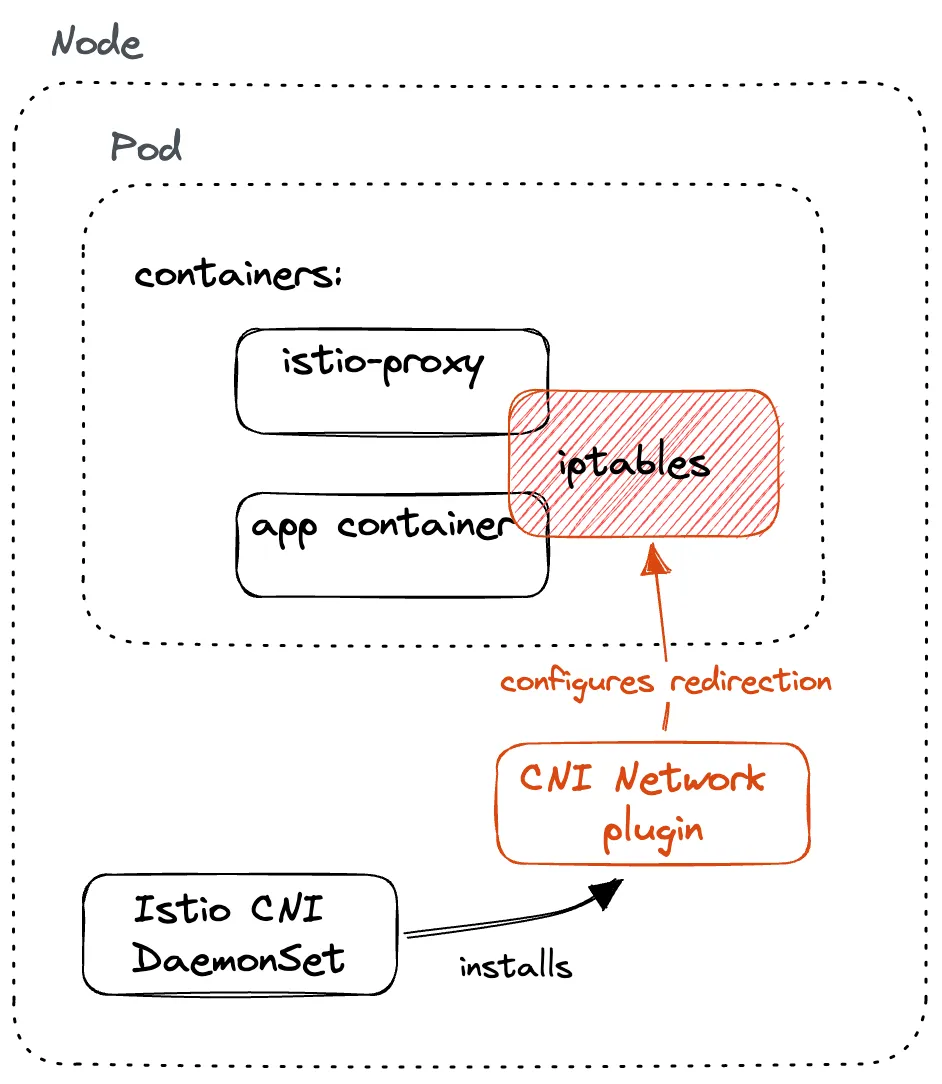
The CNI plugin is deployed as a DaemonSet, which makes the pod run on each cluster node. The CNI instance on each node handles networking for containers running on that node.
The CNI plugin container installs the CNI plugin by copying the binary (yes, CNI plugins are binaries) and its configuration to the host node that’s mounted inside the container. From that host directory, the Kubernetes container runtime can load and run the plugin.
With the binary in place on the host, it’s up to Kubernetes container runtime to call the plugin with different operations whenever it’s setting up container networking. For example, when a new pod is scheduled, the container runtime sends the ADD operation to the plugin, which in turn ensures the container gets connected to the network.
Istio CNI in ambient mesh
As I mentioned in the previous section, the purpose of the CNI plugin is to configure networking for containers and connect (or disconnect) them to the host network.
The Istio CNI plugin sets up the pods’ network using iptables so that the traffic gets intercepted by the proxies – the same as the istio-init container did.
What is iptables? Iptables is a utility that allows configuring IP packet filter rules of the Linux kernel firewall. It’s a collection of tables with chains of rules for how to treat network packets.
In ambient mesh, there’s no concept of sidecar proxies anymore. Instead, a per-node proxy called z-tunnel proxies traffic between the workloads in the ambient mesh.
For traffic interception to work in the ambient mesh, the CNI plugin configures the network namespace in two places:
- Node: configures the network namespace on each node to transparently route inbound and outbound traffic to the node, and route it accordingly to ztunnel proxies
- Ztunnel: configures the network namespace of the ztunnel pod to route inbound/outbound traffic to specific ports on the ztunnel proxy

Note that the configuration done by the CNI plugin doesn’t directly affect any workload pods. The changes are only made in the node network namespace and in the ztunnel pods’ network namespace, regardless of the traffic redirection mechanism.
Not affecting the applications is one of the reasons that make the ambient mesh less invasive than the traditional sidecar model. There’s no need to redeploy or modify existing applications in any way, compared to when adopting the sidecar model, where one has to inject the sidecar proxy into every application deployment. By not redeploying and directly modifying the applications, we’re reducing the risk and easing the adoption curve of the mesh.
The ambient mesh is non-invasive by design and it allows for incremental adoption by simply labeling the namespaces and making your existing applications part of the ambient mesh. Once the application is part of the ambient mesh, it instantly gets the mTLS and L4 observability features.
How are the nodes configured?
The istio-cni plugin supports two (different and incompatible) mechanisms for traffic redirection in the ambient mesh:
- Redirection using iptables and GENEVE tunnels (default)
- Redirection using eBPF (experimental)
Note of caution: at the time of writing, both redirections with iptables and eBPF are experimental, and eBPF doesn’t work yet with all scenarios (for example, Cilium or Calico) and the default redirection might have issues as well.
The selection of the redirection mechanism is controlled through the redirectMode setting in the IstioOperator or Helm value. The mode can be either set to “iptables” or “ebpf.”
Here’s an example of an IstioOperator that enables ambient and sets the “ebpf” redirection mechanism:
Internally, this redirectMode value gets converted to the ambient config file that resides on the host and looks like this for the iptables redirect mode:
The redirection mechanism determines how the network is set up for nodes and ztunnel proxies and how the containers get added and removed from the ambient mesh.
We’ll explain the iptables and GENEVE tunnels redirection mode first, and then later sections explain how the eBPF redirection works.
Conclusion
In this post, I explained the role Istio CNI plays in the mesh and briefly mentioned two redirection mechanisms istio-cni uses to redirect traffic in the ambient mesh.
In the next post, I will explain how redirection using iptables and GENEVE tunnels works to capture and direct traffic in the ambient mesh.
As Solo.io is a co-founder of the Istio ambient sidecar-less architecture and leads the development upstream in the Istio community, we are uniquely positioned to help our customers adopt this architecture for production security and compliance requirements. Please reach out to us to talk with an expert.
Download the white paper: Achieve Compliance, Zero Trust with Istio Ambient Mesh.


%20a%20Bad%20Idea.png)


%20For%20More%20Dependable%20Humans.png)