How to deploy Amazon EKS Anywhere (EKS-A) with Gloo Edge, an enhanced Envoy Proxy API gateway


Let us burst a myth and explore how we can set up an Envoy Proxy API Gateway with Gloo Edge in a hybrid cloud infrastructure with Amazon EKS Anywhere (EKS-A) and connect an AWS Lambda function using Gloo Edge.

The myth is that API Gateways are for cloud or can only with be used with public cloud providers, but that is not the truth. API Gateways are suitable for any architecture public, private, or hybrid cloud. The only basic requirement is to have an API.

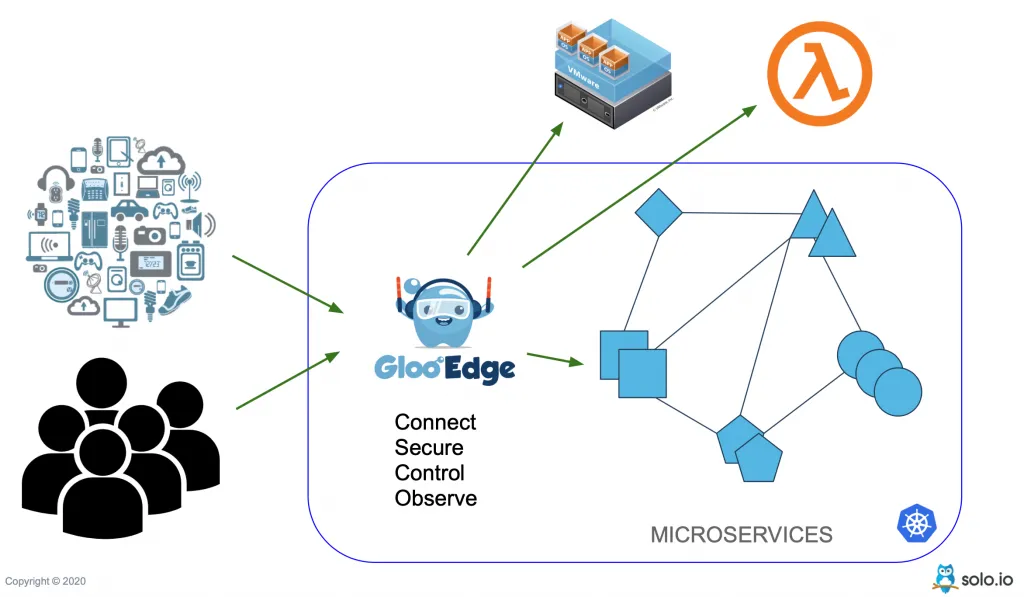
Gloo Edge is an open-source, flexible, and extensible API gateway built on Envoy Proxy for microservices Kubernetes (K8s) environments. Gloo Edge configures the behavior of the Envoy Proxy data plane to ensure secure application connectivity and policy based traffic management.

Gloo Edge Blog Feature

What do we need to set up EKS-A and Envoy Proxy?

Cloud Infrastructure

  • VMware Cloud (VMC) – infrastructure to deploy an eks-a Kubernetes cluster
  • an AWS account – with permissions to create and execute AWS Lambda functions

Tools

You might also need a Gloo Edge Enterprise License Key to deploy Gloo Edge on to the EKS-A infrastructure.

Demo Sources

To start, clone the demo sources from the GitHub repository:

git clone https://github.com/kameshsampath/gloo-edge-eks-a-demo
cd gloo-edge-eks-a-demo

For convenience, we will refer the clone demo sources folder as $DEMO_HOME:

export DEMO_HOME="$(pwd)"

Create an environment to run EKS-A and Envoy Proxy

We will set the following environment variables for convenience, and we will be referring to these variables in the upcoming sections:

export AWS_ACCESS_KEY_ID=<your aws access key>
export AWS_SECRET_ACCESS_KEY=<your aws secret key>
export AWS_DEFAULT_REGION=<the aws region to use for the resources>
export GLOO_LICENSE_KEY=<your Gloo Edge Enterprise License key>

Build an EKS-A cluster for use with Envoy Proxy

To create the EKS-A cluster, run the following command:

eks-a create cluster -f gloo-edge.yaml # (1)
  1. gloo-edge.yaml– will be generated using the eks-a generate command.
    For more information on the command please refer to the docs.

Configure Storage Class

The demo clusters does not have any default storage provisioners or storage class defined. For this demo we will use Rancher’s local-path-provisioner:

kubectl apply \
  -f https://raw.githubusercontent.com/rancher/local-path-provisioner/master/deploy/local-path-storage.yaml

Wait for the storage provisioner to be ready:

kubectl rollout status -n local-path-storage deploy/local-path-provisioner --timeout=60s

Once the provisioner is installed, check the same using the command kubectl get sc:

NAME                   PROVISIONER             RECLAIMPOLICY   VOLUMEBINDINGMODE      ALLOWVOLUMEEXPANSION   AGE
local-path             rancher.io/local-path   Delete          WaitForFirstConsumer   false                  6d13h

As you have noticed from the command output, local-path is not the default storage class. A default storage class helps in dynamic provisioning of the Kubernetes Persistent Volumes.

Let us set it as the default storage class so that any new PVC requests will be created using this Storage class’s underlying storage:

kubectl patch storageclass local-path \
  -p '{"metadata": {"annotations":{"storageclass.kubernetes.io/is-default-class":"true"}}}'

Running the kubectl get sc again shows the local-path as the default provisioner:

NAME                   PROVISIONER             RECLAIMPOLICY   VOLUMEBINDINGMODE      ALLOWVOLUMEEXPANSION   AGE
local-path (default)   rancher.io/local-path   Delete          WaitForFirstConsumer   false                  6d13h

Install Gloo Edge Enterprise

Download and install latest glooctl by running:

curl -sL https://run.solo.io/gloo/install | sh

Add glooctl to the system path:

export PATH=$HOME/.gloo/bin:$PATH

The Gloo Edge proxy is a Kubernetes service of type LoadBalancer, for the purpose of this blog we will configure it to be of type NodePort using the install-ee-values.yaml as shown below:

gloo:
  settings:
    writeNamespace: gloo-system
    watchNamespace:
      - gloo-system
      - fruits-app
  gatewayProxies:
    gatewayProxy:
      service:
        type: NodePort
        httpNodePort: 30080 #(1)
        httpsNodePort: 30443 #(2)
  1. Use 30080 as NodePort to access the Gloo Proxy
  2. Use 30443 as NodePort to access the Gloo Proxy
glooctl install gateway enterprise \
  --license-key "$GLOO_LICENSE_KEY" \
  --values "$DEMO_HOME/cluster/install-ee-values.yaml"

NOTE:

You can safely ignore the helm warnings; it will take few minutes for Gloo Edge to be ready, try the command glooctl check to verify the status.

Once Gloo Edge is deployed check if Gloo Edge is functional:

glooctl check

A successful Gloo Edge installation should show an output like:

Checking deployments... OK
Checking pods... OK
Checking upstreams... OK
Checking upstream groups... OK
Checking auth configs... OK
Checking rate limit configs... OK
Checking VirtualHostOptions... OK
Checking RouteOptions... OK
Checking secrets... OK
Checking virtual services... OK
Checking gateways... OK
Checking proxies... OK
Checking rate limit server... OK
No problems detected.
I0818 09:29:26.773174    6734 request.go:645] Throttling request took 1.041899775s, request: GET:https://127.0.0.1:57778/apis/storage.k8s.io/v1?timeout=32s

Detected Gloo Federation!

Deploy an AWS Lambda Function

Now that we have created an EKS-A cluster and deployed Gloo Edge on it successfully, let’s create an AWS Lambda function and use Gloo Edge to invoke it.

Create AWS IAM Role

aws iam create-role --role-name gloo-edge-eks-a-lambdaex \
   --assume-role-policy-document "file://$DEMO_HOME/apps/lambda/trust-policy.json"

Save the Role ARN environment variable:

export ROLE_ARN=$(aws iam get-role --role-name gloo-edge-eks-a-lambdaex | jq -r .Role.Arn)

Attach the AWSLambdaBasicExecutionRole to our role:

aws iam attach-role-policy --role-name gloo-edge-eks-a-lambdaex \
  --policy-arn arn:aws:iam::aws:policy/service-role/AWSLambdaBasicExecutionRole

Create Lambda Function

The demo is ready to deploy a simple node.js “hello world” application:

exports.handler = async (event) => {
  const response = {
      statusCode: 200,
      body: {"message": `Hello ${event.user?event.user:"there"}, welcome to Gloo Edge with Lambda.,`},
  };
  return response;
};

Let’s deploy that function using AWS Lambda:

aws lambda create-function --function-name gloo-edge-hello-lambda \
--zip-file "fileb://$DEMO_HOME/apps/lambda/function.zip" \
--handler index.handler \
--runtime nodejs14.x \
--role "$ROLE_ARN"

Let’s make sure our function works:

aws lambda invoke \
  --cli-binary-format raw-in-base64-out \
  --function-name gloo-edge-hello-lambda \
  --payload '{"user": "tom"}' \
  response.json

If the function has executed successfully, the $DEMO_HOME/response.json should have the following content:

{
  "statusCode": 200,
  "body": { "message": "Hello tom, welcome to Gloo Edge with Lambda.," }
}

Using Gloo Edge for EKS-A and Envoy Proxy

Since we have now deployed the AWS Lambda function, let’s now create the necessary Gloo Edge resources that will allow us to configure and access the Lambda via Gloo Edge Gateway. To have more understanding on some of the core concepts, check the Gloo Edge documentation.

As part of this short demo we will:

Create an AWS Secret

We need to create a Kubernetes secret that holds the AWS Keys. This secret will be used by Gloo Edge invoke the AWS Lambda function:

glooctl create secret aws \
  --name=gloo-eks-a-demo \
  --access-key="$AWS_ACCESS_KEY_ID" \
  --secret-key="$AWS_SECRET_ACCESS_KEY"

NOTE: If you have not set the environment variables $AWS_ACCESS_KEY_ID and $AWS_SECRET_ACCESS_KEY, the value from $HOME/.aws/credentials will be used.

You can check the created credentials by running:

kubectl get secrets -n gloo-system gloo-eks-a-demo -o yaml

Create an upstream resource

As part of this section we will create a Gloo Upstream that will allow the Virtual Service to talk to AWS Lambda via Gloo Edge Gateway,

IMPORTANT: If your default region is other than us-east-1, ensure you set the value for $AWS_DEFAULT_REGION to the region of your choice before running the upstream create command.

glooctl create upstream aws \
  --name="gloo-edge-hello-lambda" \
  --aws-region="$AWS_DEFAULT_REGION" \
  --aws-secret-name=gloo-eks-a-demo

Check the status of the upstream resource:

glooctl get upstream gloo-edge-hello-lambda
+------------------------+------------+----------+--------------------------------+
|        UPSTREAM        |    TYPE    |  STATUS  |            DETAILS             |
+------------------------+------------+----------+--------------------------------+
| gloo-edge-hello-lambda | AWS Lambda | Accepted | region: ap-south-1             |
|                        |            |          | secret:                        |
|                        |            |          | gloo-system.gloo-eks-a-demo    |
|                        |            |          | functions:                     |
|                        |            |          | - gloo-edge-hello-lambda       |
|                        |            |          | - my-function                  |
|                        |            |          |                                |
+------------------------+------------+----------+--------------------------------+

Create a route

A route is a Gloo Virutal Service resource that allows us to access the API, i.e. the services that are deployed on to Kubernetes.

apiVersion: gateway.solo.io/v1
kind: VirtualService
metadata:
  name: greeter
  namespace: gloo-system
spec:
  displayName: AWS Lambda Greeter
  virtualHost:
    domains: # (1)
      - "example.com"
    routes:
      # Application Routes
      # ------------
      - matchers:
          - prefix: /greet # (2)
        routeAction:
          single:
            destinationSpec:
              aws: # (3)
                logicalName: gloo-edge-hello-lambda # (4)
            upstream: # (5)
              name: gloo-edge-hello-lambda
              namespace: gloo-system
  1. Domains that will be allowed by the gateway
  2. The prefix to access the API
  3. The destination spec type
  4. In this case, an AWS Lambda function named gloo-edge-hello-lambda
  5. The upstream that wil be used to route the request

Let us create the virutal service:

kubectl apply -n gloo-system -f $DEMO_HOME/apps/lambda/gloo/virtual-service.yaml

Check the status of the virtual service:

glooctl get vs greeter
+-----------------+--------------------+-------------+------+----------+-----------------+------------------------------------+
| VIRTUAL SERVICE |    DISPLAY NAME    |   DOMAINS   | SSL  |  STATUS  | LISTENERPLUGINS |               ROUTES               |
+-----------------+--------------------+-------------+------+----------+-----------------+------------------------------------+
| greeter         | AWS Lambda Greeter | example.com | none | Accepted |                 | /greet ->                          |
|                 |                    |             |      |          |                 | gloo-system.gloo-edge-hello-lambda |
|                 |                    |             |      |          |                 | (upstream)                         |
+-----------------+--------------------+-------------+------+----------+-----------------+------------------------------------+

Gloo Proxy URL

We need to use the Gloo proxy to access the API, we can use glooctl to get the proxy URL:

export GLOO_PROXY_URL=$(glooctl proxy url)

IMPORTANT:

glooctl proxy url always returns the hostname of the Kubernetes nodes. You can check the hostnames using the command kubectl get nodes

Resolve Nodes via /etc/hosts

NOTE: You can ignore this section if your nodes are resolvable by their names.

We are assuming that your VMC environment does not have a DNS resolver to resolve the EKS-A Kubernetes node names. In such cases we need to add the node names to the /etc/hosts file for them to be resolved.

kubectl get nodes \
  -ojsonpath="
{'#GLOO EDGE DEMO\n'}{range .items[*]}{.status.addresses[?(@.type == 'ExternalIP')].address}{'\t'}{.metadata.name}{'\n'}{end}") \
  | sudo tee --append /etc/hosts

Invoke Function

Check if the API is accessible:

http --body POST $GLOO_PROXY_URL/greet 'Host: example.com' user=tom

NOTE:

We have to use the host header ‘Host: example.com’ as we have restricted the gateway domains of the Virtual Service to example.com only. In the next chapter we will use the wildcard domain that will allow all the domains.

The command should return a list of fruits as shown,

{
    "body": {
        "message": "Hello tom, welcome to Gloo Edge with Lambda.,"
    },
    "statusCode": 200
}

TIP:

Try the same request as show below to see the other response headers http POST $GLOO_PROXY_URL/greet 'Host: example.com' user=tom

Cleanup

glooctl delete vs greeter
glooctl delete upstream  gloo-edge-hello-lambda
aws lambda delete-function --function-name gloo-edge-hello-lambda

Detach policy,

aws iam detach-role-policy --role-name gloo-edge-eks-a-lambdaex \
  --policy-arn arn:aws:iam::aws:policy/service-role/AWSLambdaBasicExecutionRole

Delete the Role,

aws iam delete-role --role-name gloo-edge-eks-a-lambdaex

Remove entries from /etc/hosts file,

export NODE_COUNT=$(kubectl get nodes --no-headers | wc -l)
sudo sed -i -e '/#GLOO EDGE DEMO/,+'"${NODE_COUNT}d" /etc/hosts

Summary

As part of this short blog we explored how to:

  • Create an EKS-A cluster
  • Deploy Gloo Edge
  • Use Gloo Edge to invoke an AWS Lambda function

Gloo Edge is not restricted to AWS Lambda, it can also be used to connect traditional applications and Kubernetes microservices. Head over to our workshops to learn more things you can do with Gloo Edge.

Read our other blogs about how Solo works with Amazon EKS Anywhere: