
At Solo.io, we enjoy working with enterprises at various stages of their cloud journey. As a tech startup, in the early days we often collaborated with early adopters in the space, organizations who were moving rapidly up the cloud native experience curve. In many cases, their entire organization was “cloud native,” in that their entire infrastructure suite was born in the cloud.
Now as foundational technologies like containers and Kubernetes orchestration have crossed the chasm, Solo works more frequently with enterprises who are not so far along in their cloud journey. These are often large enterprises who have enjoyed business success for many years, and their IT infrastructures reflect that legacy.
In discussing the current and future capabilities of service mesh technology, we often hear questions like this:
“How can a service mesh like Istio help me along my cloud migration journey?”
The basics: Connect, secure, observe
Of course, we respond to those queries with the basics: how service mesh enables you to connect, secure, and observe service networks both inside and outside of cloud deployments.
One key advantage of service meshes is their ability to provide a consistent set of networking and traffic management capabilities across different environments. This can be especially useful when migrating applications to the cloud, as it can help to ensure that the same policies and configurations are applied regardless of whether the application is running on-premise or in the cloud.
Another advantage is their ability to provide advanced traffic management features such as load balancing, circuit breaking, and traffic shaping. These features can help to ensure that applications are able to handle the increased traffic and scale dynamically as needed.
Service meshes also add a high degree of visibility into the behavior of applications, which can be extremely valuable when migrating to the cloud. This can help to identify and troubleshoot issues quickly, and ensure that service networks are behaving as expected.
But what about the migration process?
While enterprises all value the benefits associated with the end-state of cloud migration, organizations early in that process are eager to know how a service mesh can assist with the migration process itself.
- Can a service mesh facilitate the lift-and-shift of applications from on-prem environments to the cloud? Even better, can it help us move-and-improve those services?
- What about the initial deployment of a service migrating to the cloud?
- What about the transitional period when production traffic might be directed to both environments?
- How about facilitating the retirement of the legacy application?
We’ll explore all of these topics in this article, including a simple example that you can replicate in your own environments using the Istio-based Gloo Platform from Solo.io.
Example: Simplify cloud migration with Gloo Platform
We’ll build and test an example to show how you can use Gloo Platform and Istio to facilitate the process of moving an application from a VM-based deployment to a Kubernetes cluster.
If you’d like to follow along in your own environment, you’ll need a Kubernetes cluster and associated tools, plus an installation of Gloo Platform. We ran the tests in this blog on Gloo Platform v2.3.4 with Istio v1.17.2. We hosted all of this on a local instance of k3d v5.4.3. (We’ll provide a single-command installer that will allow you to set up and later tear down all the infrastructure on a local workstation.)
You’ll need a license key to install Gloo Mesh Enterprise if you don’t already have one. You can obtain a key by initiating a free trial here.
For this exercise, we’ll also use some common CLI utilities like kubectl, curl, and git. Make sure these prerequisites are all available to you before jumping into the next section. I’m building this on MacOS but other platforms should be perfectly fine as well.
Clone GitHub repo
The resources required for this exercise are available in the gloo-gateway-use-cases repo on GitHub. Clone that to your workstation and switch to the gloo-gateway-use-cases example directory. We’ll primarily be using the resources in the cloud-migration example.
Install Gloo Platform
As this is a getting-started example with Gloo Platform, you’ll only need a single k8s cluster active. However, if you already have multiple clusters in place, you can certainly use that configuration as well.
If you don’t have Gloo Platform installed, there is a simplified installation script available in the GitHub repo you cloned in the previous section. Before you walk through that script, you’ll need three pieces of information.
- Place a Gloo license key in the environment variable
GLOO_GATEWAY_LICENSE_KEY. If you don’t already have one of these, you can obtain it from your Solo account executive. - Supply a reference to the repo where the hardened Solo images for Istio live. This value belongs in the environment variable
ISTIO_REPO. You can obtain the proper value from this location once you’re a Gloo Mesh customer or have activated a free trial. - Supply a version string for Gloo Mesh Gateway in the environment variable
GLOO_MESH_VERSION. For the tests we are running here, we usev2.3.4.
If you’ve never installed any Gloo Platform technology before, you will need to import a Gloo Platform helm chart before the installation script below will work properly.
Now from the gloo-gateway-use-cases directory at the top level of the cloned repo, execute the setup script below. It will configure a local k3d cluster containing Gloo Platform and an underlying Istio deployment. The script will fail if any of the three environment variables above is not present.
The output from the setup script should resemble what you see below. If you require a more complex installation, a more complete Gloo Platform installation guide is available here.
Create a Gloo Platform Workspace
A Workspace is a really important feature in Gloo Platform 2.3. By providing a team-oriented artifact “container”, Workspaces make it much easier to express policies that clearly delineate boundaries between resources that are owned by various teams within your organization. The Workspaces you specify in turn generate Istio artifacts that enforce multi-tenant-aware policies. You can learn more about them here.
In our case, we’re focused more on the basics of using our gateway and service mesh to facilitate cloud migration. So we’ll delve into the details of multi-tenancy with Gloo Platform in other forums. For our simple use case, we’ll create a namespace and a single Workspace to reflect the domain of our ops-team that is maintaining our gateway capability.
You can create the Workspace above using this command:
You should see results like this:
Establish a VirtualGateway
Let’s establish a Gloo Platform VirtualGateway that we’ll attach to the default istio-ingressgateway that was configured when we installed our local Istio instance earlier. We’ll configure this gateway to handle our inbound, north-south traffic by selecting any RouteTables that are specified in the ops-team workspace. We’ll create such a RouteTable momentarily. Here is the VirtualGateway YAML:
Now we’ll apply this configuration to establish the north-south gateway:
That should yield a result like this:
Migration blueprint
We’ll begin our cloud migration journey by assuming that there is an existing service, perhaps deployed on a VM somewhere, that we want to migrate into our nascent mesh. We need to carefully orchestrate this transition to ensure that existing users are not disrupted, and that the final product is fully deployed inside our service mesh with all of its traffic control, security, and observability benefits.
There are dozens of different ways we could accomplish this, but let’s follow this simple process:
- Stage 1: Route requests to existing external service
- Stage 2: Dark-launch the new in-mesh service
- Stage 3: Split traffic across the old and new services
- Stage 4: Retire the old service
Migration stage 1: Route requests to existing external service
To get started, we’ll first add an API endpoint to our new service mesh gateway, and use that to route traffic to the existing service. This will make it easier to seamlessly transition to the new service when it’s ready for prime time.
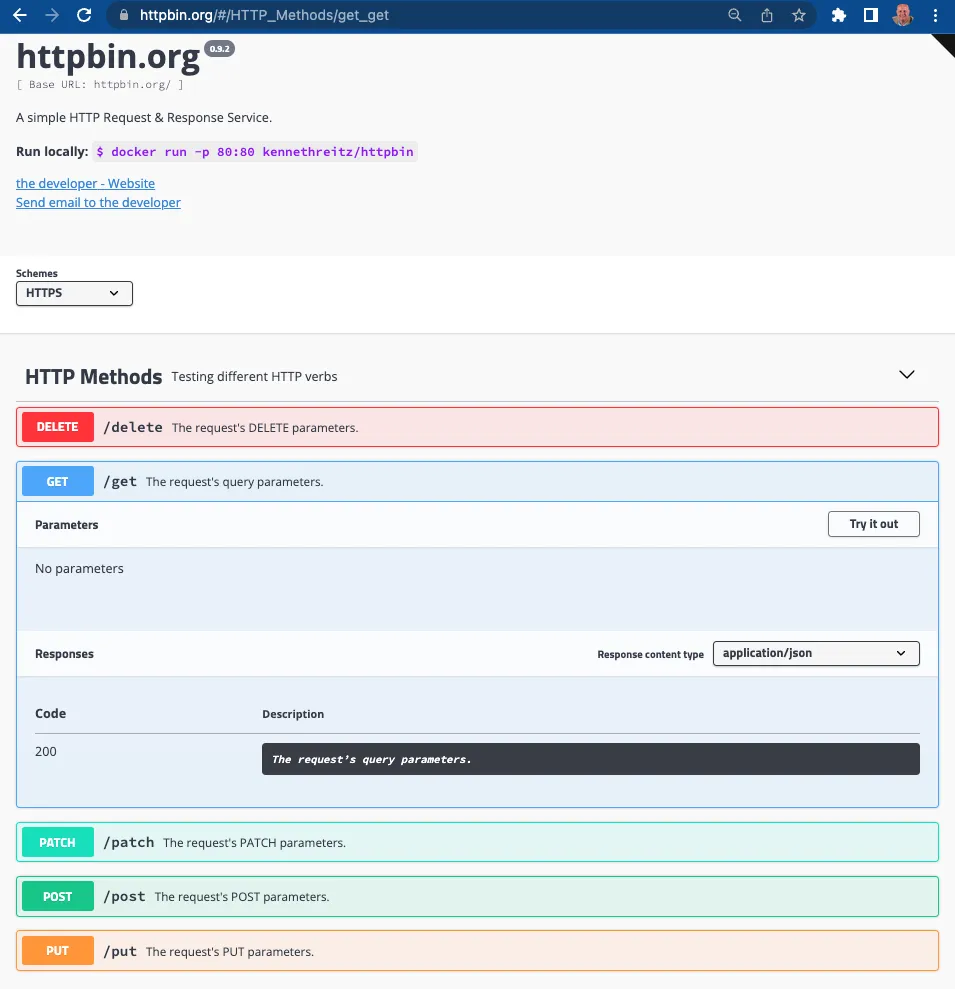
As a stand-in for our existing service, let’s use the public instance of the httpbin instance, accessible everywhere at httpbin.org. Httpbin is a nifty little REST service that can be used to test a variety of http operations and echo the response elements back to the consumer. Its public instance is deployed in AWS and will represent version 1 of the service, before we begin its cloud migration.
Establish an external service
Since the public httpbin lives outside the service mesh we are building, we’ll first need to establish an ExternalService object to allow our mesh gateway to route traffic to it.
Use this command to instantiate this object in our mesh:
Expect to see this response:
Create the routing policy
RouteTables are a key Gloo Platform abstraction that specify routing policies to apply to requests. You can learn more about them in the request routing documentation here. For this exercise, we require a simple RouteTable that attaches to our north-south-gw and routes all inbound requests to the external httpbin service. Typically we will be more “picky” in our request matching, looking for elements like specific paths, specific header names and values, and compliance with external authorization policies to determine our routing targets. But in this case, we’re accepting all requests appearing at this gateway and routing them to the ExternalService we established in the previous section.
Use this command to establish the RouteTable:
Expect this response:
Test the external service routing
Now we’ll use curl to access the gateway we’ve published from our local k3d instance and confirm that requests are being routed to the external httpbin. (This request may need to be modified if you’re using a different Kubernetes configuration.)
The following response comes from the external httpbin.org deployed on AWS. One way to confirm this is the presence of the header X-Amzn-Trace-Id . That response header would not have been generated if httpbin had been installed in our local k3d cluster.
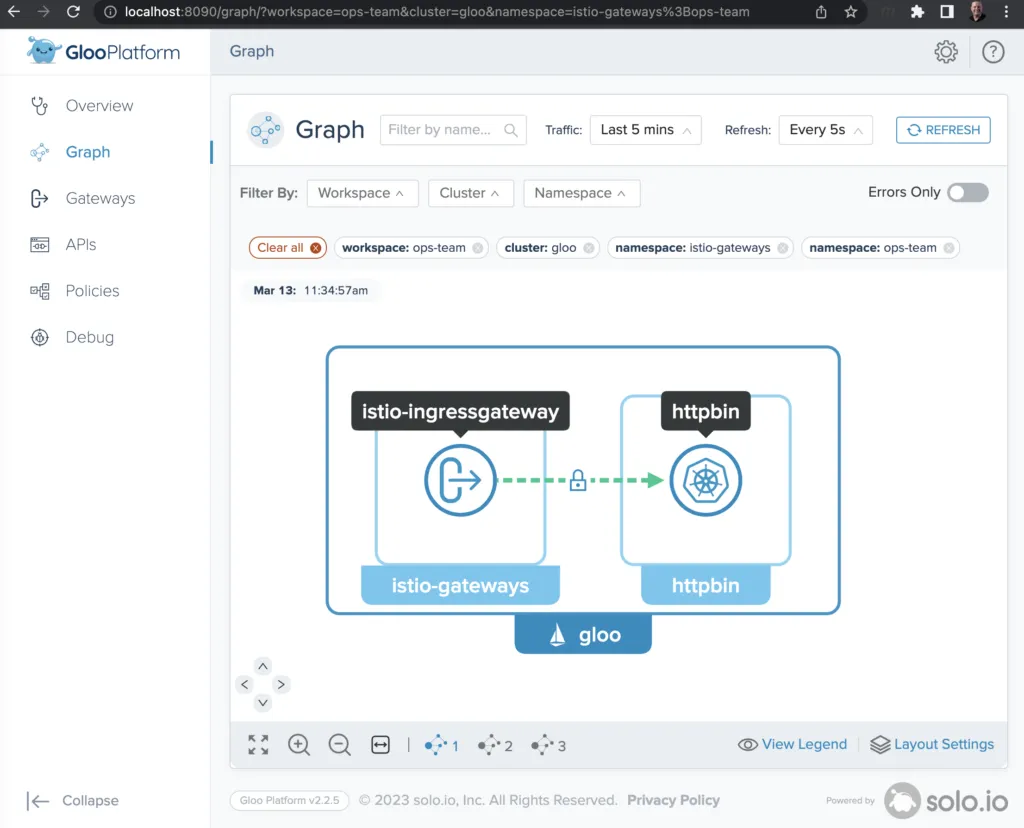
Use the Gloo Platform UI to visualize traffic flows
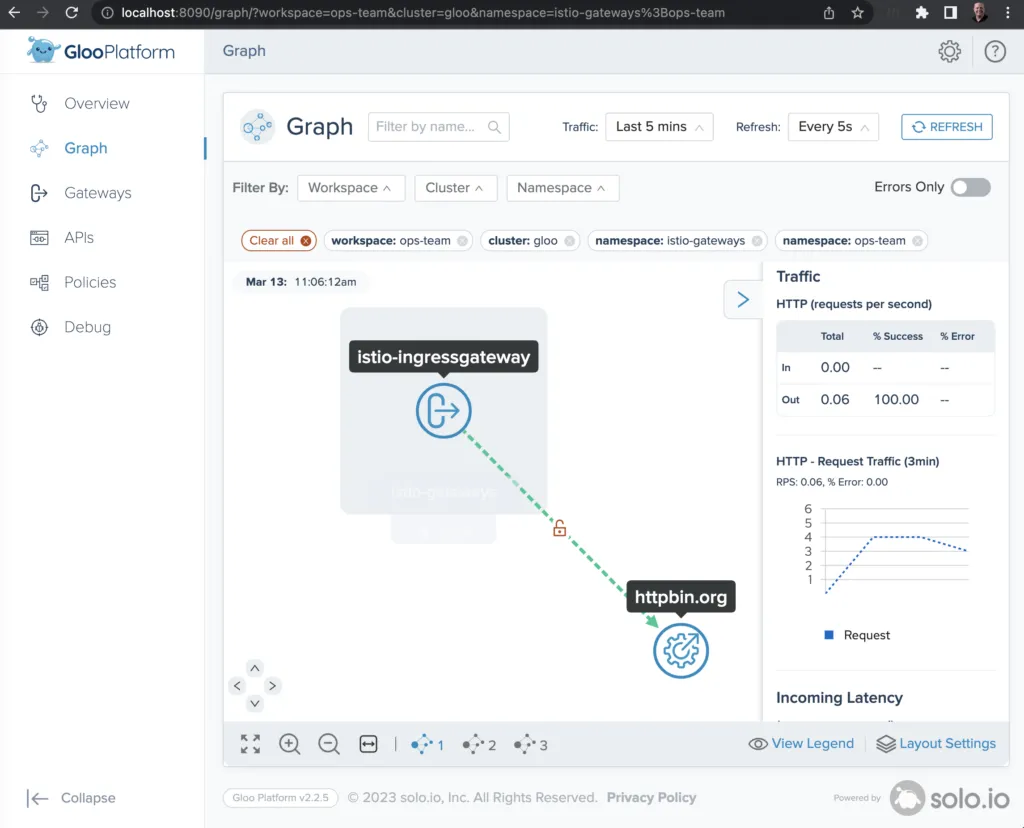
Another convenient way to visualize traffic flows and debug using Gloo Platform is to use the flow graph bundled with the Gloo Platform UI.
An easy way to enable this at development time is to port-forward the interface of the gloo-mesh-ui service, like this:
Now point your browser at http://localhost:8090 and switch to Graph on the left navigation menu. Next to Filter By:, be sure to select all Workspaces, all Clusters, and all Namespaces. After a few seconds to allow for telemetry collection and processing, you’ll see a graph like the one below showing the istio-ingressgateway delegating 100% of its requests to the external httpbin.org service. (You can also fire off a few additional curl commands like the one above to the gateway endpoint in order to make the statistics slightly more interesting.)
Migration stage 2: Dark-launch the new in-mesh service
Dark-launching is a great cloud migration technique that releases new features to a select subset of users to gather feedback and experiment with improvements before potentially disrupting a larger user community.
We will simulate a dark launch in our example by installing the new cloud version of our service in our Kubernetes cluster, and then using declarative policy to route only requests containing a particular header to that new instance. The vast majority of users will continue to use the original version of the service just as before.
Install httpbin application
In Stage 1 of this example, we used the external httpbin service to respond to all our requests. Now we’ll begin the cloud migration of our service by installing the httpbin service to run inside our k3d cluster. Use these commands to establish a dedicated Namespace and ServiceAccount to support the in-mesh httpbin Service:
You should see that the namespace, service, and deployment are all created:
Modify the routing policy
To support the dark launch, we’ll add a routing rule to our existing httpbin RouteTable. The initial route to the external httpbin.org service remains unchanged, but note that we have added an httpbin-in-mesh route. This route looks for a request header with the name in-mesh and a value of true. In that case only, it will route the request to the new internal version of the httpbin service that we are dark-launching. All other traffic will route to the external service just as before.
Now let’s apply this new RouteTable with the following kubectl command:
Expect this response:
Test the dark launch routing
To test the new routing policy, let’s begin by using the same curl command as before:
That should produce a successful response, with an X-Amzn-Trace-Id in the response, indicating that the request was routed externally. You can also confirm the external routing by observing the response header x-envoy-upstream-service-time. For external routing like this, the value will be in the hundreds of milliseconds, 563 in this case. But for internal routing, the Envoy upstream time typically stays under 100 milliseconds.
Use the in-mesh: true header with the response, and note that our dark-launch routing succeeds in forwarding the request to the internal service. Use this command:
Verify this by noting the lower Envoy upstream time and the absence of the X-Amzn-Trace-Id response header.
A quick peek at the Gloo Platform UI graph in your browser will also show the routing from our ingress gateway to both the internal and external httpbin services. If these results don’t appear right away, enable all the Filter By: options are enabled, issue some more curl commands, and wait a few seconds for telemetry processing.

Use the Gloo Platform UI to visualize routing rules
While we’re looking at the Gloo Platform UI, we might enjoy visualizing other aspects of our service mesh, too. All of the routing rules we specify in this exercise are applied in YAML format. For more complex rules, you might also benefit from visualizing those routes in the Platform UI.
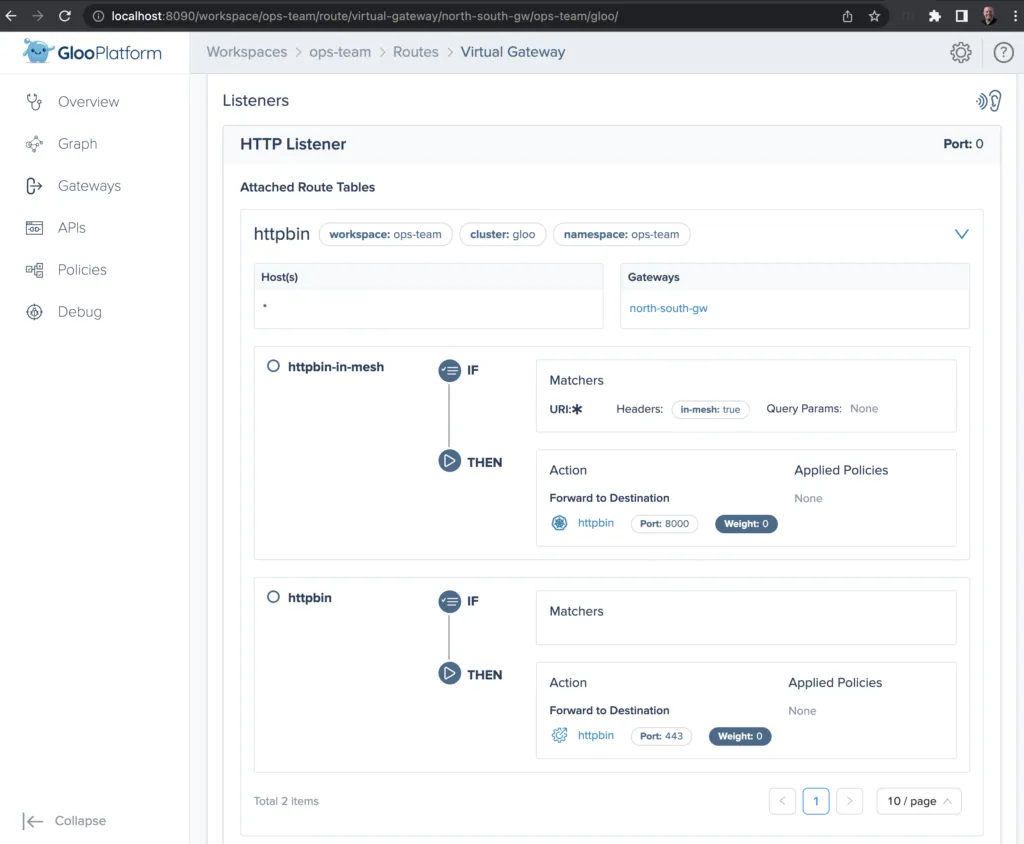
In order to try that out here, switch to Gateways on the left navigation menu, then click through the north-south-gw gateway and expand the httpbin route table. You should see the two routes that we’ve defined, one to the internally deployed service and another to the external service, as shown below. Note the in-mesh header as part of the predicate for selecting the internal route, while other traffic is routed externally, just as we specified it.
Migration stage 3: Split traffic across old and new services
After a successful dark-launch, we may want a period where we use a blue-green strategy of gradually transferring user traffic from the old, external service instance to the new, internal one. Let’s explore this with a routing policy that splits our traffic evenly, sending half our traffic to the internal instance and the other half externally.
We will modify our RouteTable to accomplish this to remove the header-based routing that drove our dark launch. Then we will replace this with a 50-50 weight applied to each of the routes, as shown below:
Apply the RouteTable change with this command:
Expect this response:
To verify this change, we’ll run a script that sends 10 requests to the endpoint, and we’ll count the responses that have a marker to indicate external routing. This will average out to sending 5 requests to the external route:
Expect to see a response of 5, or something reasonably close to that.
Migration stage 4: Retire the old service
Now we have developed confidence in the new migrated, internal version of our service. So let’s apply a final change to our routing policy that eliminates the external routing altogether and removes the weighting we used to distribute load across multiple routes.
Apply this change with the following command:
Expect to see this response:
Now when we run our test script as before:
We expect to see a response of 0, because traffic is only being routed internally now. You may also want to confirm this by taking another look at the Gloo Platform flow graph. If your Traffic lookback window is sufficiently short — 5 minutes in the example below — to only capture traffic that’s been sent since the most recent routing change was applied, then you should only see traffic being routed to the internal httpbin service, as shown below:
Exercise cleanup
If you used the setup.sh script described earlier to establish your Gloo Platform environment for this exercise, then there is an easy way to tear down this environment as well. Just run this command:
Going beyond the basics: Next steps to explore
Thank you for taking this introductory cloud migration tour with us. There are dozens of different avenues you might want to explore from this starting point. Here are a few ideas:
- This example deployed our new service in a simple, single-cluster environment. Explore the richness of multi-cluster routing with automated failover from the Gloo Platform documentation here.
- Our scenario assumed a single application team. Real-world enterprises need a service mesh that supports the division of responsibilities across platform teams and multiple application teams. Gloo Platform’s multi-tenancy features make this much easier.
- Lift-and-Shift is only a first step for cloud migration. Most applications have opportunities to Move-and-Improve. A common area where enterprises want to improve their services as part of cloud migration is externalizing authorization code from the underlying applications into declarative policies. The Gloo Platform service mesh offers a Swiss-army knife of external authNZ features to enable this transition. See Part 2 of this blog series where we explore extending this example with external authorization features.
Learn more
In this blog post, we demonstrated how to use Gloo Gateway to facilitate cloud migration from an externally deployed service to one managed within a Kubernetes cluster and an Istio service mesh.
All resources used to build the example in this post are available on GitHub.
Do you want to explore further how Solo and Gloo Platform can help you migrate your workloads to the cloud with best practices for traffic management, zero trust networking, and observability?
- Find hands-on training resources for both Gloo Platform and its underlying open-source components at Solo Academy.
- Explore the full Gloo Platform documentation here.
- Reach out to Solo experts on the Solo.io Slack community and particularly the #gloo-mesh channel.
- Request a live demo or trial.
- See video content on the solo.io YouTube channel.


%20For%20More%20Dependable%20Humans.png)


