
You have APIs, now make it easy for your clients to use them
On our quest to increase development velocity, security, and improve management, one of the more powerful patterns businesses can put into use is an API Gateway. Gloo Edge is built on Envoy as a next generation API Gateway that can be up and running in any Kubernetes environment in minutes.
Gloo Portal extends Gloo Edge by giving developers and administrators the ability to manage, share, secure, and even monetize their APIs. So far so good, however consuming APIs for many is still a daunting task. It means writing code, parsing and managing payloads, testing, and likely some amount of frustration before achieving desired results.
Using Swagger Codegen with Gloo Portal can simplify the experience by enabling the generation of Client SDKs. Swagger Codegen does even more, however for this article, we will focus on how we can deploy Codegen and make it available via Gloo Portal for users to create SDKs in many different languages and frameworks against available services.
Prerequisites
Get started by deploying Swagger Codegen in a Kubernetes Cluster that is also running Gloo Edge and Gloo Portal. If you do not have Gloo Edge and Gloo Portal please use the following links to start your free trial.
Gloo Edge Envoy Proxy API Gateway | Solo.io
Gloo Portal, an Istio developer portal for K8s, Gitops, and CI/CD | Solo.io
To install our Gloo Products on your own cluster, follow this simple guide for Gloo Edge and this guide for Gloo Portal.
We are using EKS in AWS as our Kubernetes cluster for this article however, Gloo Edge and Gloo Portal will install on any current deployment of Kubernetes. Please make sure to have kubectl and curl configured as well.
Deploy Swagger Codegen with Petstore
Create a deployment and service manifest that will define our Swagger Codegen application. Swagger maintains a public Codegen image that acts as its own web service. We will also use the Petstore example as the service we plan to create client SDKs for.
We’ll start by deploying the Petstore service. First create a namespace for Petstore with kubectl.
kubectl create ns petstore
Each time a sample manifest is provided it will be followed by a kubectl command. Save the sample manifest as a yaml file in your favorite editor. Then use kubectl to apply the manifest to your cluster.
Sample Deployment manifest for Petstore:
kubectl apply -f <sample_deployment_petstore>.yaml
Sample Service manifest for Petstore:
kubectl apply -f <sample_service_petstore>.yaml
Now let’s deploy the Codegen service.
Sample Deployment manifest for Codegen:
kubectl apply -f <sample_deployment_codegen>.yaml
(We are not using custom generators in our jetty library but if you plan to add them please consider changing the persisted volume type from in-memory to physical storage.)
Sample Service manifest for Codegen:
kubectl apply -f <sample_service_codegen>.yaml
With our two applications deployed in Kubernetes, we should see both pods up and running in the same namespace:
kubectl get pods -n petstore

Enable Functional Discovery in Gloo Edge
Gloo Edge will automatically search your Kubernetes clusters for new services and create an upstream resource for each service discovered. However, functional discovery, the ability for Gloo Edge to read the available Swagger specification and provide a list of each available endpoint, must be enabled for namespaces manually. Run the following command to label the namespace appropriately:
kubectl label namespace petstore discovery.solo.io/function_discovery=enabled
Once labeled, execute the following command and confirm the endpoints Gloo Edge discovered:
glooctl get upstreams
If you did not install glooctl when installing Gloo Edge and Gloo Portal please install it now.
Getting Started :: Gloo Edge Docs (solo.io)
The result from running glooctl get upstreams should look like the following:
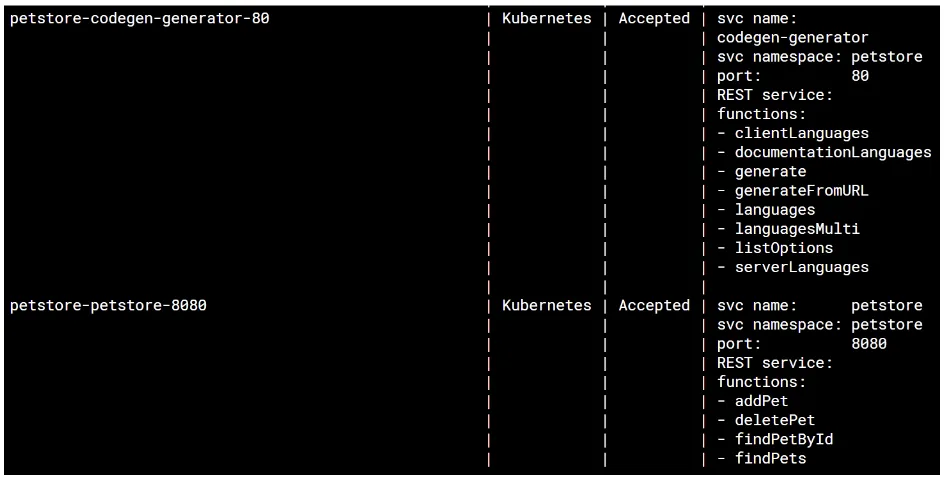
If you are using a different service in place of our petstore example and your REST endpoints have not been discovered, you may need to modify the Upstream to point to the proper path for the Swagger specification.
Please see our documentation for steps on how to update the created Upstream manually.
Configuring Function Discovery :: Gloo Edge Docs (solo.io)
Use Gloo Portal to deploy the Petstore service and the Codegen service
With Gloo Edge automatically discovering the endpoints our two services provide we will now create a Portal so users can access and explore the APIs available to them.
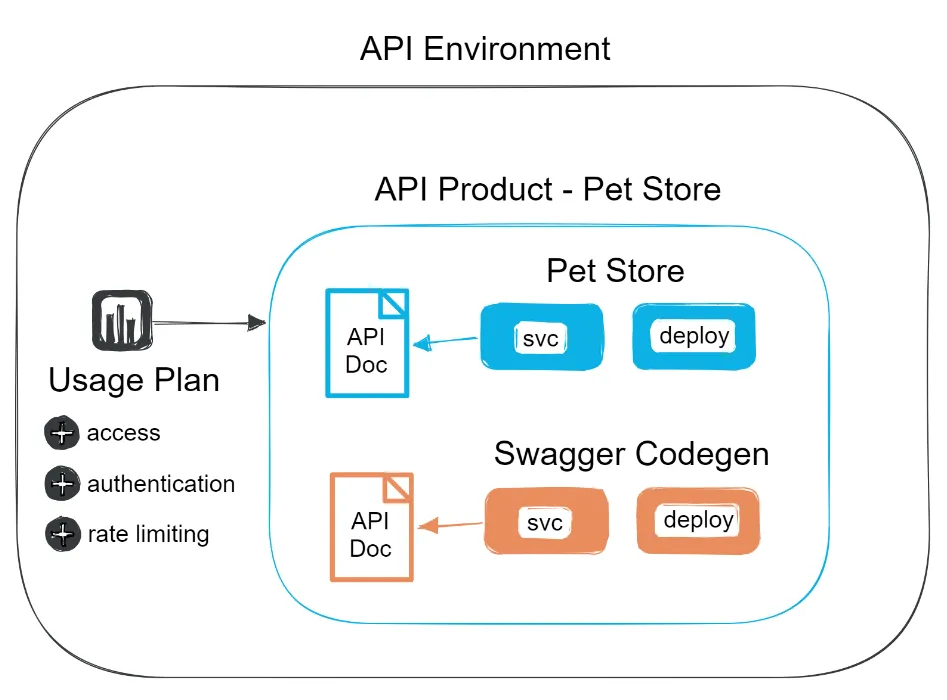
A Portal is made up of a group of API Documents, API Products, and Environments. The graphic below is an overview of what the relationship between these resources look like in Gloo Portal.
Create the API Document
The first resource we need to create is the API Document. The API Document will tell Gloo Portal where it can find the Swagger specification that serves as the API schema for each of our services. The fetchUrl requires a DNS, since we are working within a single Kubernetes cluster we can use the internal DNS route for the service.
Sample Petstore API Document:
kubectl apply -f <sample_api_doc_petstore>.yaml
Sample Codegen API Document:
kubectl apply -f <sample_api_doc_codegen>.yaml
Create the API Product
All API Documents must be part of an API Product. An API Product may contain a single API Document or multiple documents. If using multiple documents it may be useful to apply the override function. The example below shows how to implement this properly.
Sample API Product manifest:
kubectl apply -f <sample_api_product_petstore>.yaml
When the gatewayConfig API is used within the apis array it will override all gatewayConfig routes that are defined externally. These overrides are useful when API Documents are grouped within an API Product that are not versions of the same API endpoints.
With our API Documents defined and included within an API Product we now need to define an Environment. The Environment will expose all API Products we wish to include.
Create an Environment
The Environment resource requires a domain to be provided that will be used to make your API Products available. This domain should be routed to the Gloo Edge gateway. I’m using an AWS EKS Cluster for this demo environment so I created a canonical name (cname) record for the domain listed in the Environment resource (api.george.gl00.net) in Route 53 that routes traffic to the AWS ELB. The ELB is created for the gateway-proxy in Gloo Edge.
Run the following command to list your Gloo Edge Gateway Proxy:
glooctl proxy url
Sample Environment manifest (update with your own domain value):
kubectl apply -f <sample_environment_petstore>.yaml
Create a Portal
Our Portal is how we will make our endpoints viewable to our users. The Portal resource creates a static site where our API Products, published via the Environment resource, are accessible through the Gloo Portal UI. Users and Groups with the proper access can test and interact with each endpoint defined.
We also need to provide our Portal a domain so it may be accessed via our Gloo Edge Gateway. Similar to what we did for our domain in the Environment resource, I created a cname and applied it to the ELB representing the gateway-proxy.
Sample Portal manifest (update with your own domain value):
kubectl apply -f <sample_portal_petstore>.yaml
One important item to note is setting the allApisPublicViewable to false. If set to true any user can access your endpoints but they won’t be able to try them out. Having the ability to try out APIs is one of the main tenets of publishing APIs to users. Make sure to set the value to false and we’ll create a simple user and group for proper authentication.
Good work on getting this far! We have installed our two services, Gloo Edge has discovered and created upstreams for each, and we have created our first Portal in Gloo Portal so our users can access the APIs available in our services.
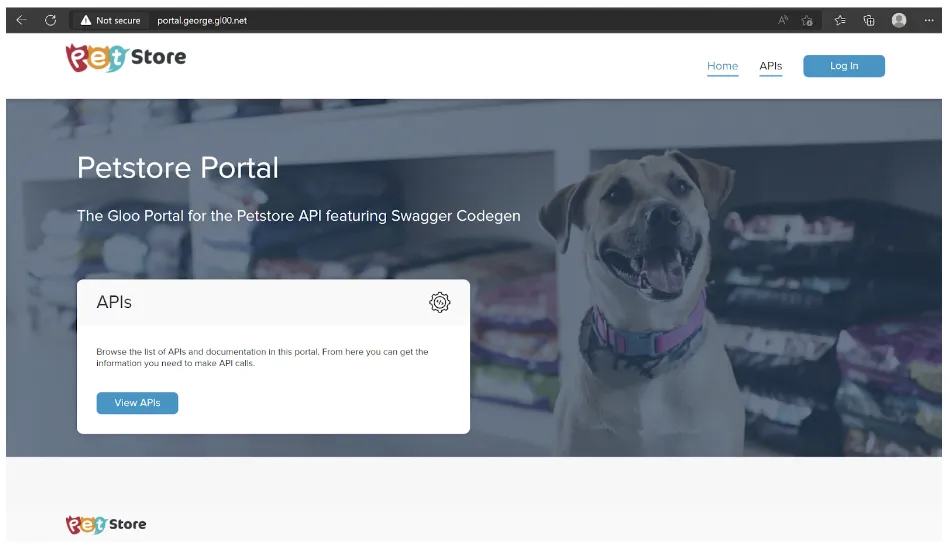
Access your new Portal by entering the domain provided in your Portal manifest:
Create a User and Group
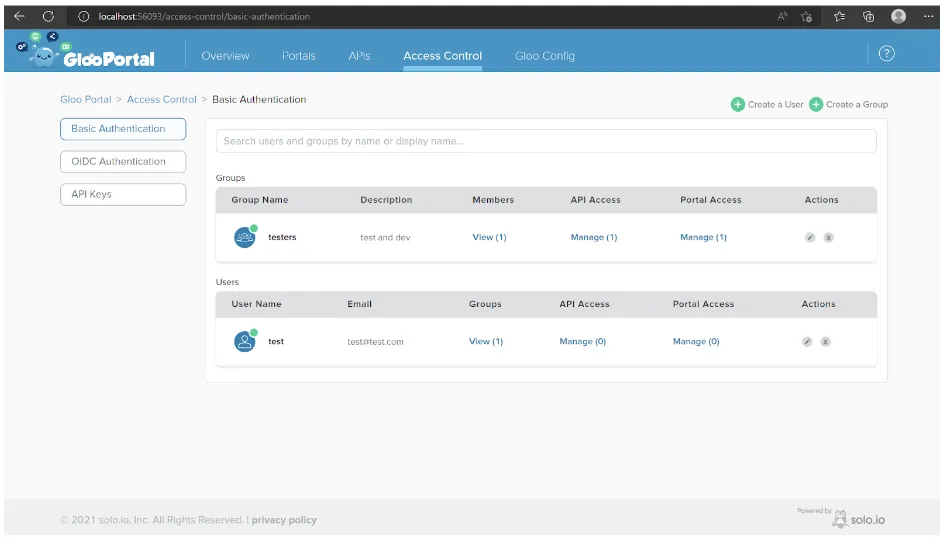
The admin dashboard may be used to create multiple types of access control.
kubectl port-forward svc/gloo-portal-admin-server 8080 -n gloo-portal
For our purposes we’ll use basic authentication to create a user and group. I will continue to provide example manifests and commands as done throughout this article but consider using the admin console for this step to gain experience with it.
The Gloo Portal Admin dashboard:
Follow the link below to create a test user and group. Make sure that the group created has API and Portal access.
Create Users and Groups :: Gloo Portal (solo.io)
If the Gloo Portal admin console was not used to create a user and group, (otherwise please scroll down to the next section) let’s first create our group then we’ll add a user to that existing group. Our group will define an access level that contains our created Environment with the corresponding API Product along with our newly created Portal.
Sample manifest for our Gloo Portal Group:
kubectl apply -f <sample_group>.yaml
With our group created, let’s add a user so we can access the APIs that were published. Our user will require a secret to hold the password value. We’ll use kubectl to create it.
Sample manifest for our Gloo Portal User:
kubectl apply -f <sample_user>.yaml
With our user created and access given to the desired API Product, we are ready to navigate back to our Portal doman and test our APIs.
Create a Client SDK using Swagger Codegen in Gloo Portal
We are finally here, the moment we have been waiting for. How do our APIs look in our new Portal? Let’s login and find out!
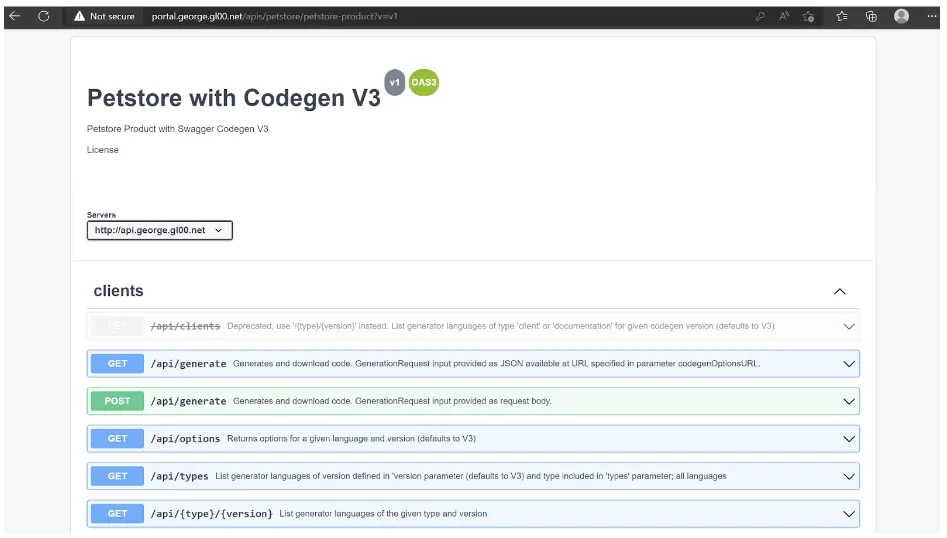
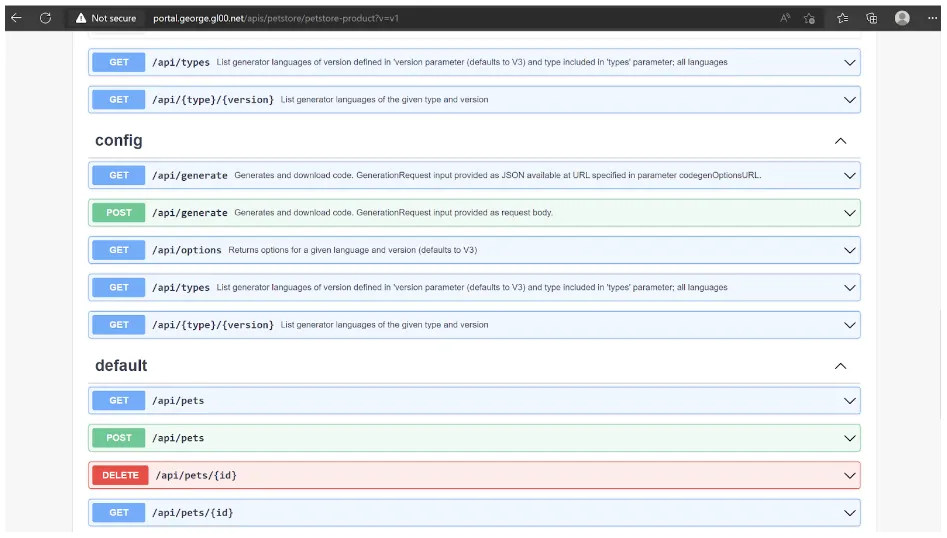
In addition to our Codegen APIs we should also see the four APIs available for the Petstore service:
Generating a client SDK requires access to the service’s swagger specification. To access the specification for Petstore we’ll need to make it available.
Create a path to the Petstore Swagger specification
The Gloo Edge upstream resource uses a swagger specification to identify the available APIs however, that usually does not include a path to the specification itself. To add the path manually, as we’ll need to do for the Petstore service, we’ll create a new API Document that will be referenced from our existing API Product resource.
Sample manifest for our new Petstore API Document:
kubectl apply -f <sample_api_doc_spec_petstore>.yaml
With the new API Document added we can modify our existing API Product to include the new reference:
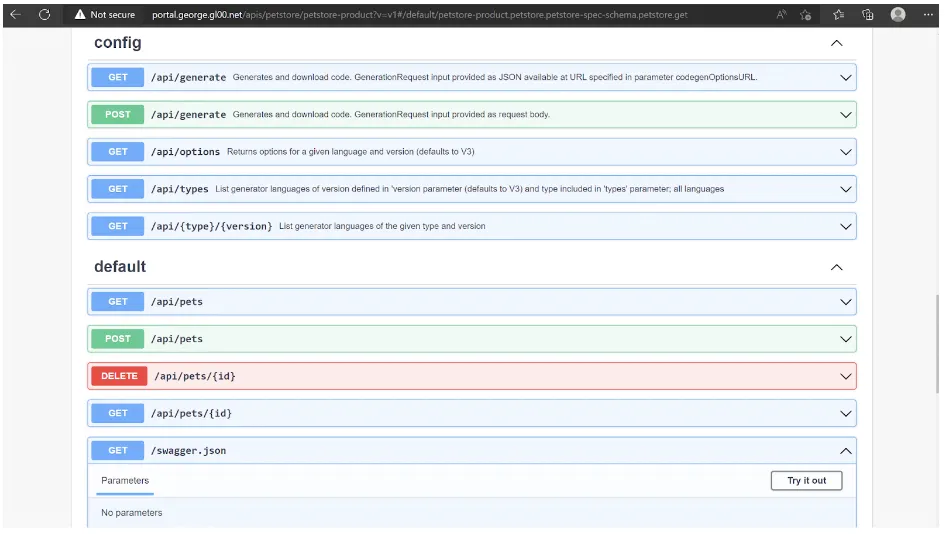
Apply the change using kubectl and navigate to your Gloo Portal APIs page, we should now see an additional endpoint added to our view:
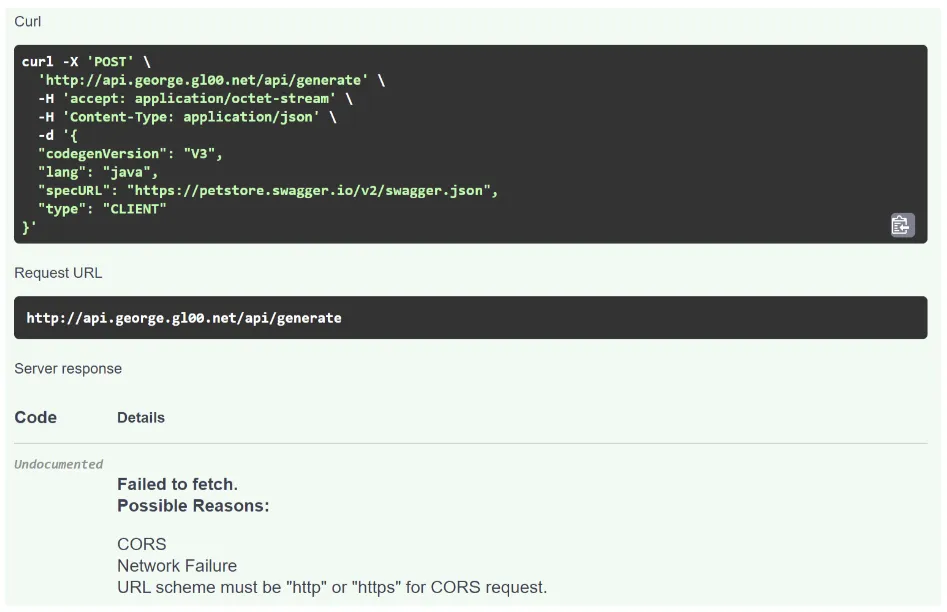
CORS Policy error
When attempting to generate a Client SDK you may receive an error in the response field similar to the following:
A bit more detail can be found if we open the developer tools section of our browser:

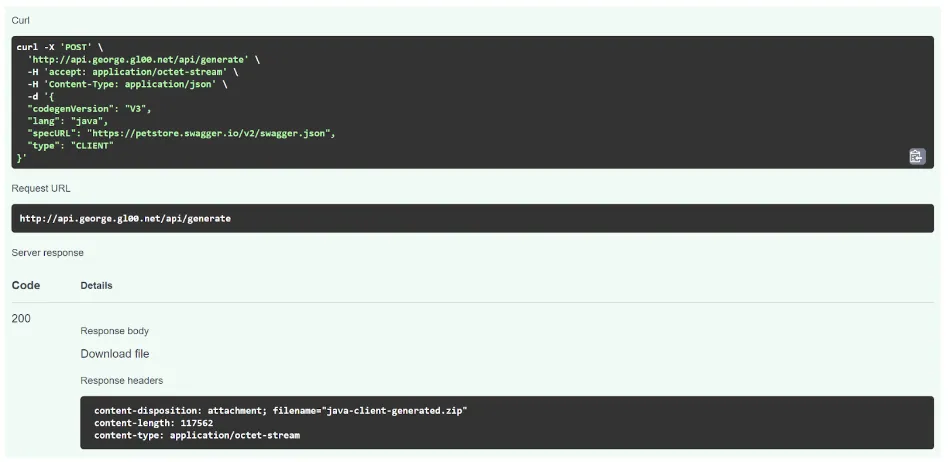
The preflight check executed by the browser is determining the content-type header is not allowed and thus not allowing the request to continue. We can confirm this by doing a curl and verifying it will generate the desired client zip package.
curl -X POST –header ‘Content-Type: application/json’ –header ‘Accept: application/json’ -d ‘{“specURL”: “https://petstore.swagger.io/v2/swagger.json”, “lang”: “java”, “type”: “CLIENT”, “codegenVersion”: “V3”}’ ‘http://api.george.gl00.net/api/generate’ > result_java.zip
There is a simple fix for the issue, we need to add the additional header to our Environment manifest. If you used the sample I provided above you will already have this defined and likely have not received an error message. However, depending on the environment, headers may need to be changed or added so this is worthwhile noting.
kubectl apply -f <sample_environment_petstore>.yaml
With the header added and the error resolved you should now receive a 200 response from the server.
Learn More
Congratulations for working through this blog post. In my next article we will take what we accomplished a step further and create a dynamic page in Gloo Portal. Using a small amount of JavaScript and HTML, we will create a simple front-end for the Codegen API hosted in the Portal we created. Users, with a click of a button, will create and download the Client SDK of their choosing against any available Swagger specification. We will also limit the amount of Codegen endpoints we expose on our API Page. Until then, please take a look at our documentation.
- Explore the documentation for Gloo Edge.
- Explore the documentation for Gloo Portal.
- See video content on the solo.io YouTube channel.
- Questions? Join the Solo.io Slack community and check out the #gloo-edge channel.
Consulting Services
Don’t go it alone. An ancient Talmudic expression (paraphrased) means one must consider receiving help in order to thrive. At Solo.io we offer Consulting Services so your team and your business will thrive on your journey. We live and breathe API Gateway, Enterprise Istio Service Mesh, API Management, and GraphQL, including best practices implementing CI/CD. We build solutions on AWS, Azure, GCP, OpenShift, VMs, and local Kubernetes deployments e.g. Kind. Contact us at sales@solo.io and we will get back to you as soon as possible.


%20For%20More%20Dependable%20Humans.png)


